Saturday, December 29, 2012

The January 2013 Kit at BOAF is Just Lovely!

The January Kit at Birds of a Feather is just absolutely LOVELY! There are so many gorgeous papers and plenty of sparkle and fun! The colors are wondeful and the embellishments that Amy chose are just perfect- from ribbons to brads to the fun little bottles of acrylic paint! This is a perfect blend of colors and I adore the set of alpha stickers that she chose! It's safe to say that I just love it all!

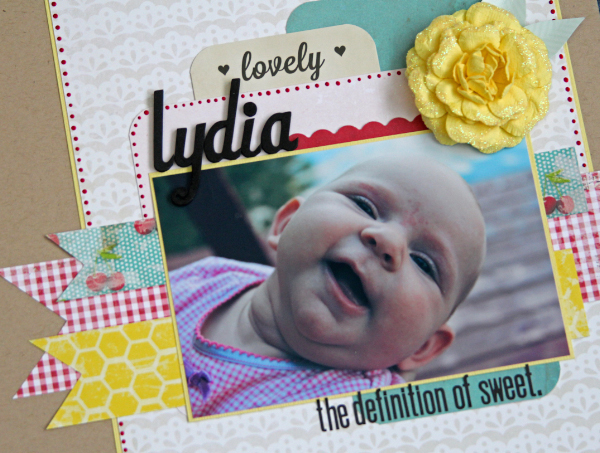
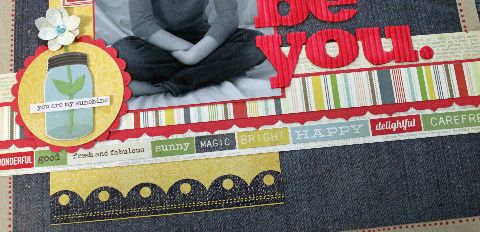
Speaking of lovely.... let's talk about sweet little Lyida! She is truly the definition of cute and as sweet as can be. She's the daughter of two friends that I work with and she's just perfect! I took some photos of her as she was snuggling and smiling with her mom on a beautiful day at the lake last summer.


I used the red acrylic paint from the kit extras to make the little dots that go around the layout. The bottle is so easy to control and the paint dries really fast! The word "lovely" is from the Pink Paislee Photograms in the main kit and the leaves for the flower are cut from the Photograms packaging.

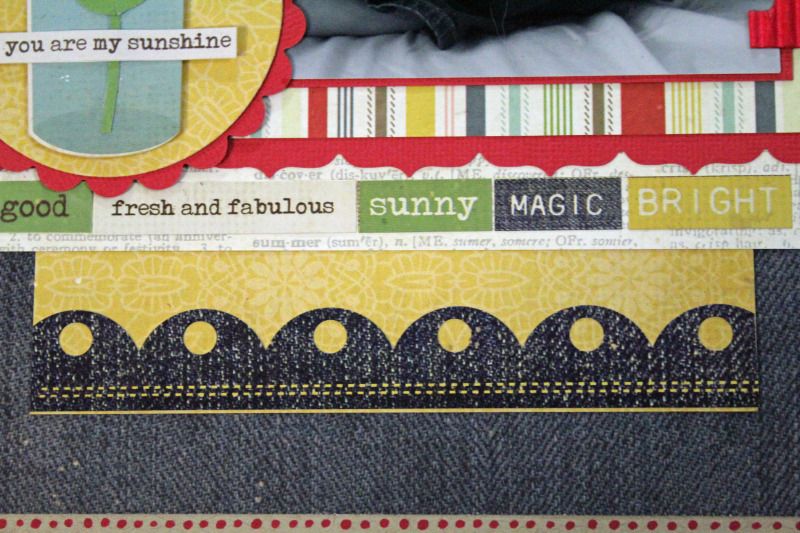
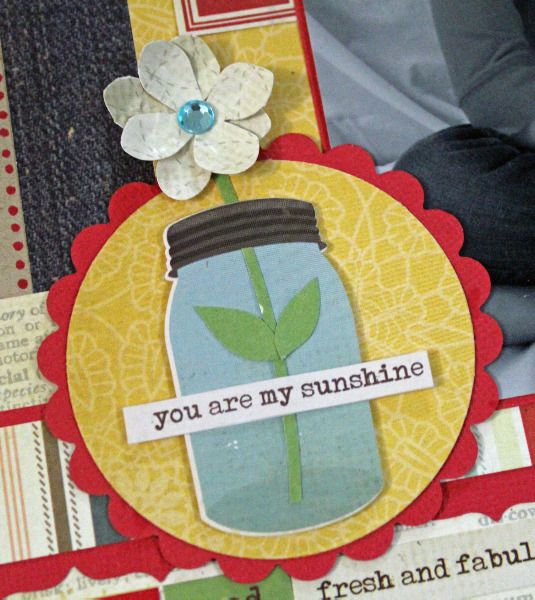
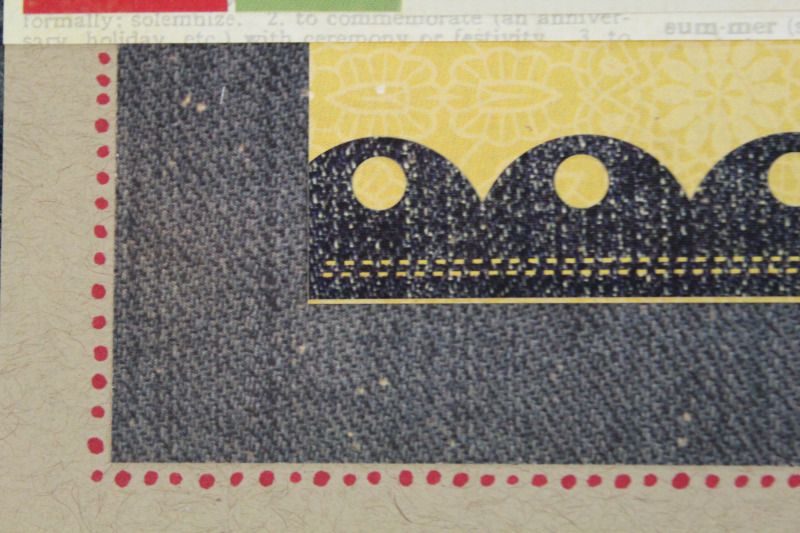
Here's a closeup so you can see a few more details!

Today is my Great Aunt Muriels' 80th birthday. So, this card was created for her. She is a wonderful, strong lady who has been a smiley part of my life for as long as I can remember. Happy Birthday, Aunt Muriel!

I hope you've enjoyed my projects today and that you are loving the January Kit as much as I am! If you'd like to get your hands on this kit, check it out HERE!

And, don't forget to check out the challenges on our forum. Amy has posted some great challenges this month to inspire you!

By the way- I just realized that I forgot to post the winner of my $10 BOAF GC here on my blog!  It was on the BOAF Forum, though... Congratulations to Ann Jobes!
Thanks so much for stopping by today!

Friday, December 14, 2012

BOAF Winterfest Blog Hop!

Happy Friday and welcome to the Birds of a Feather Winterfest Crop 'n Hop! Hopefully, you have been directed here from Kristin's blog. If you are just visiting (and weren't directed here from Kristin's blog), please join us for the complete Blog Hop and Crop. All you have to do is start HERE, hop from blog to blog,and finish up at the Birds of a Feather blog.

To make it even more fun, we have a super interesting progressive layout challenge planned for you. IF you complete the entire Hop, leave a comment on each participant’s blog, complete the layout challenge AND you get it posted in the gallery by midnight on Sunday, December 16, you will be eligible for a FAB SCRAPS-Christmas Collection: Spiral Bound Book ($20 value)
When you visited Kristin's blog, you saw the sketch part of the progressive challenge.  My part of the challenge is to ADD STITCHING!  It can be by machine, or by hand but you have to get out that needle and thread!

Here's my layout with the sketch and the stitching:

If you're thinking that my layout looks a little incompelete, well you're right!  All I have is what you should have so far, Kristin's sketch and stitching.  You have to complete the hop to see what the rest of the elements are.  And, check out the BOAF Gallery this weekend to see my completed layout!

Rememer to leave a comment here, AND if you are already a follower of my blog, or choose to become one, I'll pick a winner of a $10 Gift Certificate to the BOAF Boutique!!  The winner will be posted on Monday, December 17th!

Okay, it's time to hop on over to Linda's Blog to continue on with the fun! Remember, if you finish the entire hop, leave a comment on everyone’s blog, complete the challenge layout and get it posted in the gallery by the deadline, you are eligible for that darling FAB SCRAPS prize! Enjoy the rest of the crop and I sure hope you will join us over at the forums for a weekend full of scrapping, games and fun!

Thanks for stopping by and don't forget to head to Linda's Blog next!

Thursday, December 13, 2012

It's December at Birds of a Feather!

...and the December kit is TO DIE FOR!  It's seriously beautiful full of MME and BG goodies!  Yum!  I've had two reveals so far, but have been a slacker about sharing them on my blog.  So... here you go!

First a layout with photos taken last year when we went sledding.  I love how the black and white photos play off of the soft colors of the papers.


This is a fun project where I made little goodie bags of Chocolates to give away at Christmas time.  I think the office staff at my school will be pretty happy with these!  And, there's a tutorial on how to make them on the BOAF blog.  Just you can see it HERE.

 
And, now a few cards!  This one is a simple, fun card made with the December kit:
 
 
And finally, this fun and super easy card also made with the December kit.  The branch is made using the Martha Stewart Branch Punch.  So, fun!
 
Thanks so much for stopping by today!  Come back tomorrow for the BOAF Winterfest Blog Hop-n-Crop!  It's going to be a blast!  Come see the crop details HERE.

Wednesday, November 28, 2012

Let the Party Begin!

...the Christmas Card Party, that is!  I am notorious for making tons of cards and never actually giving them to anyone.  Well, that's all going to change this year!  I'm challenging myself to make and GIVE AWAY at least 20 Christmas cards this year!  So, I wanted to come up with a fun and simple card that would be easy to replicate many times over.

Here's what I came up with using the Simple Stories Handmade Holiday Collection from A Walk Down Memory Lane!


Thanks so much for stopping by today!  I hope you like the cards and are inspired to make some of your own!

Friday, November 23, 2012

Sunburst Card Tutorial

Hey, there everyone!
Today I want to share a quick tutorial that I shared on the Birds of a Feather Blog last week!  It features the fabulous November 2012 Kit and is a great way to use up scraps!

A few weeks ago, I uploaded a layout that included a sunburst pattern and a few people asked how I did it. So, I decided I'd share. This is a great way to use up scraps when you have created several projects (ok LOTS of projects) with your kits!

Today, I'm going to show how to do a card, but used the exact same techinque on THIS LAYOUT.
First of all, start with a piece of cardstock that is the size that you want your finished sunburst to be. (My finished card is 4 1/2" X 6", so my cardstock piece is 4" X 5 1/2") The color doesn't matter because it will be completely covered when you're done. Then, punch a circle from a random scrap of cardstock and adhere it where you'd like the center of your sunburst to be.

Now comes the fun part! Just start cutting wedge shapes of paper and adhering them to your cardstock with the point of the wedge landing on the centerpoint circle. As you work your way around, you may find that some of the wedges don't land exactly in the center of the centerpoint circle. That's ok-- you'll see why when you see my finished card.


And, keep adding more wedges....


And go all the way around until it looks something like this: (Note: usually my wedges laid flat against eachother, but sometimes it was necessary to overlap them in order to keep the curve).


Then, flip this mess... ahem... I mean "beautiful starburst"... over and you should see this:
Now, using your scissors or paper cutter, cut along the edge of your original piece of cardstock. You should be left with this:


Now, using your scissors or paper cutter, cut along the edge of your original piece of cardstock. You should be left with this:


Now, all that's left is to finish your card. You'll see that I matted the starburst pattern and then added that to my card base. I also used a circle for my sentiment that covered the center point of the starburst so that you don't see where all of the points didn't come exactly together.


Isn't that FUN?! I love using this technique- especially when I love a paper collection or kit and I just can't bear to throw any of the scraps away! I hope you liked my tutorial and that you're inspired to try one for yourself. 

Thanks so much for stopping by my blog today!

Sunday, November 11, 2012

More November Kit Goodness!

The November kit at Birds of a Feather is just incredible!  Every month I think that Amy has put together the best kit ever... and then comes the next month!  Beautiful, beautiful kits!  This month's kit features papers from Simple Stories and Lily Bee, embellishments from Prima and ScrapFX and lots more!  Check it out HERE to get yours!

Here are two cards I've made so far with the kit:

For this one, I cut a bunch of leaves from the various papers included with the kit and then adhered them to a chipboard circle from my stash with a liquid glue.  Then, just added a ribbon, stamped a sentiment and, voila!  A beautiful card!

For this one, I used some of the Lily Bee paper from the patterned paper add-on and cut the quilt looking strips out of it.  Then, I just layered the strips one on top of another until I had the size I wanted.  Then, I matted it and added it to my card along with a stamped sentiment and a beautiful flower from the kit!
So glad you stopped by today!  If you haven't checked out the BOAF November kit, do it now befofe they're all gone!!

Come back soon for more scrappy projects!

Saturday, November 10, 2012

I'm FALLING for the November Kit...

...at Birds of a Feather!  It's an incredible kit featuring Simple Stories, Lily Bee, Prima, chipboard, twine and more!  Seriously-- there are a few kits left so HURRY and get them now!

Here are some layouts that I've created with the kit:
My sweet Duffy boy playing in the leaves in the yard.  I really think he's the happiest dog ever!
 
 I made a little rake to go with the beautiful leaves included in the kit.

And a close-up of the photos... isn't he the cutest?!

And another layout about playing in the leaves-- this time my kiddos!

Check out this incredible ScrapFX Chipboard tree!  I used a leaf punch to make the leaves.

Thanks so much for stopping by today!  I'll share the cards I made so far with the kit tomorrow!  And, if you haven't got your November Birds of a Feather Kit yet, go HERE to check it out!

Friday, October 26, 2012

A Peek into my Scrappy Brain!

(My photo links in my first attempt at this post failed, so re-posting with photos this time...)

This is an article that I wrote that appeared in last week's newsletter from A Walk Down Memory Lane. Just go HERE to subscribe to these fabulous weekly newsletters!

Whenever I'm asked to describe my scrapping style, I usually respond with "Clean & Simply Detailed." Often my layouts have a very clean and simple look to them, but upon further inspection actually have a lot of detail to them. I want to share some of the techniwues that I like to use with you and how they impact the overall look of my layout.

First of all, here's the layout:

It looks pretty simple, but there's actually quite a bit going on here....
Grounding: One technique that I used throughout the layout is somethng called grounding. One way to think of grounding is that every element on the page, from the photo to the title to the journaling is always touching something else. Every element is linked in some way and nothing is just left "floating. Just a few ways that I used grounding here are:
  • The photo comes into contact with the background paper, the patterned paper strips, the title and the flower element.
  • The title is touching the photo and the paper strips.
  • The small "tape" embellishment in the upper right hand corner is grounded to the edge of the paper.
  • Tucking the word "JUST" into the negative space of the "b" for the title helps to connect the small word to the larger word without them actually touching.
Focus: As a scrapper, you have to decide what you want the person looking at your work to see first. I love this photo of my daughter, so I wanted the eye to be drawn to it. By grounding the the photo with so many elements, it keeps the eye focused on the photo. I always find that putting a mat on my photo in a coordinating color helps to draw the eye, as well. Also, little things like having the scallops on the border sticker pointing toward the photo help, too.

 
Journaling: I hate to journal. Hate it. Most of my layouts consist of journaling that includes the basics about the photo or event. I often use song lyrics or poems. Here, though I used the word stickers included with the paper collection to make a line of words that describe my daughter.
Dimension: There are several things on the page that give dimension, or at least the illusion of dimension. One thing I did was to mat my photo. Adding a mat to a photo using a contrasting, but coordinating color helps to not only bring the eye to the photo, but it helps to "pop" it off the page. I also used a corrugated alpha for my title that adds texture and dimension. The small flower element has quite a bit of dimension. I punched two small flowers and used a petal roller to cause the petals to curl up. Then, I added foam tape to the back of the "jar" as well as the flower to raise them off the page. I also cut a "stem" for the flower and made a cut in it to give the illusion that it is coming out of the jar. Adding a sticker over the jar with words on it creates just one more layer of "pop."
 
 
Color: There's lots to say about color, but here I just want to point out how I color to bring the page accents together. Many of the small details such as the photo mat, the scallop on the flower accent, the main title letters and the dots around the page are all the same color. I used a copic marker to color the letters and to create the dots around the page (to give the illusion of a mat). I find that using the same (or coordinating colors) for this helps to tie the elements of the page together
 

These are just some of the techniques that I use on a regular basis to create the look I'm going for. Another favorite is the "visual triangle" and I'll be sharing more about that in an upcoming blogpost.
I hope you enjoyed this little peek into how my mind works and how my layouts come together!
You can find all of the products used on this layout at A Walk Down Memory Lane!
Thanks so much for stopping by today! Come back soon!

Friday, October 19, 2012

It's Sketch Time!!

During this busy (ok...totally INSANE) week, I almost forgot to share the October Card Sketch from My Sketch World!  The fabulously talented Lucy Chesna has done it again and designed a beautiful sketch for us to play...ahem... I mean WORK with!

 
And, here's the card I came up with....
 
 
All of the papers, ribbon, chipboard and brads came from the October Birds of a Feather kit!

Thanks for stopping by!  Be sure to swing by the MSW Blog to see what the rest of the design team did with the sketch.  And, be sure to stop back here tomorrow.  I've been a blogging slacker and have quite a few projects to share with you!

Sunday, October 7, 2012

Live, Laugh, Love

These are words to live by. These are words I need to be reminded of and words that I hope my children take with them when they go off to live their own lives.

This layout uses the fantastic October Birds of a Feather kit and a photo from my cousin's wedding last August. I wanted to keep it simple and to the point and I also wanted to focus two specific design concepts: creating a visual triangle and keeping all of the page elements grounded. I purposely didn't add any journaling because I wanted the title and the photo to speak for itself.
 
Here's a closeup of the title, banner and one of the pieces of my visual triangle. I loved using the chipboard pieces from the kit and I just LOVE the embossed cardstock! It pained me to cut it-- it's definitely something I would have otherwise hoarded! I used some of the chipboard buttons to anchor the banner along with some twine from the kit, as well.


And, next comes a super simple card that I plan to send to my grandmother. She's been in a nursing home since a fall at Easter that broke her hip. She loves to get mail, and we've been making a special effort to send her cards at least once a week. So, the majority of the cards I've made lately have been with her in mind.

Thanks so much for stopping by today! This October Kit has been a dream to work with! The papers and embellishements are all so beautiful and thoughtfully put together!  If you have an opportunity to check out the BOAF Kits, you should!  I can tell you that the next kit is TO-DIE-FOR and you are definitley not going to want to miss it!

Friday, October 5, 2012

CAKE!!!

That's right-- CAKE!!  Now that I have your attention, let me tell you a little about the layout I'd like to share with you today.  My mom's birthday is in July and my daughter's birthday is in August.  With the family schedule, we couldn't get everyone together for my mom's birthday until August 4th.  Since my daughter's birthday was the following weekend, we had the bright idea of doing a "double" party so that the family wouldn't have to travel two weekends in a row.

Once the party plans were in place, we decided that these two special ladies needed an extra special cake!  My daughter LOVES to watch the cake shows on TV.  So, we found an amazing cake decorator in the area and shared the idea of a two sided cake!  If you looked at the cake from one side, it was "Elizabeth's cake" and represented the things she loves:  bright colors, PURPLE and peace signs.  And, if you looked at the other side of the cake, it was "Mom's Cake" decorated with things she loves: her garden and her Yorkie, Gizmo!

And, of course, this extra special cake needed a layout all to itself!  I used the Jillibean Soup Coconut Lime Soup collection (available at A Walk Down Memory Lane)!


I really wanted to include a photo taken from the top of the cake, but the size of the photo that I had printed didn't work with the layout that I had put together.  So, I decided to hide the photo!  I used one of the journaling spots as a pull tab so that you can just pull the photo out to see it!

And, here's a photo of the layering, the journaling and the title! 
Thanks so much for stopping by today!  We LOVED the cake and hope you like it, too!

Saturday, September 29, 2012

My Handsome Guy

Hey there, everyone!
Just getting caught up on some projects to share and I have a fun layout today.  I've been hoarding this line of Simple Stories papers since the summer and just couldn't bring myself to cut them.... until now.  I wanted to share the sunburst technique so I put a tutorial in the AWDML Newsletter!  If you don't get this fantastic newsletter in your in-box each week, just go HERE.  It's full of fabulous info and I know because I'm the editor!  ;)

Isn't it fun?!
Thanks for stopping by!  I've got more projects to share coming up soon, so be sure to come back soon!

Sunday, September 23, 2012

It's almost October...

...and that means that I get to start working with the October kit from Birds of a Feather!!

There are so many wonderful goodies in the October kit and they work for any kind of project imaginable-- boy themed, girly, or somewhere in between!!

My first layout with the kit features photos from a trip to a friends' farm this past spring. It was "kidding" season and the barn was full of sweet little baby goats! They were so cute and sweet and WAY more cuddly than we thought a "farm animal" could be! I've been hanging on to these photos since the spring waiting for just the right papers and inspiration to come along! The October kit along with a sketch from Becky Fleck was just what I needed!


Here's a closeup!

Like I said-- this kit can go from boyish to girly in an instant! Here's a card that just SCREAMS femininity with all of the PINK! The pink is toned down just a little by the lovely lace ribbon that creates a perfect contrast to build on for the sentiment stamp.


Thanks so much for stopping by today! If you haven't checked out the October Kit, you definitely should- it's fabulous! Be sure to keep check back on the BOAF Blog to see what else our fabulous Design Team creates with the kit!

Wednesday, September 19, 2012

It's that time of year...

Sadly, it's that time of year when summer has drawn to a close and the back-to-school "fun" begins.  The kids were somewhat excited, but I was VERY sad to see summer end.  Of course, mostly because it meant I had to go back to work!!

As always, hubby has the job of taking the first-day-of-school photos.  Since I can't exactly take the first day of school with my students off to see them on their way, he gets to have that duty.  I had my camera all charged up and ready for him, and he got a few pretty good shots this year.  Here's the layout I created with the Simple Stories Elementary Collection. 


I just love this collection for it's colors and designs.  The stickers are great and the overall design isn't too "little-kid".

Here's a closeup of the little flags I made using a strip of paper wrapped around a wooden skewer that was trimmed to size and some of the cardstock stickers to mark the dates of the school year,
 
And, it seems like no layout of mine is complete these days without putting at least a few of the banner strips on there somewhere.  I just love making these using my square punch!  So easy and SO trendy and fun!

 
Thanks so much for stopping by today!  I'm STILL not all caught up with everything I've been doing, so make sure you come back soon!

Monday, September 17, 2012

Chevron Fun (Tutorial)!

I have a fun tutorial posted on the AWDML Blog on how you make your own folded Chevrons!  It's super easy and the result is fantastic- nice clean edges and a bit of dimension!  Check out the tutorial HERE and let me know what you think!

This is the layout I created using a mix of Echo Park A Boys Life and their Boy Collection Pack.
I love how the order of the photos reflects the journaling and the steps he took to learn to skate.  And, best of all, HE loves this layout and even thanked me for it.  Love that kid!

Thanks so much for stopping by today!  Be sure to pop back in to catch up on what I've been up to!

Saturday, September 15, 2012

A new sketch...

It's the 15th of the month and that means a fun new card sketch from Lucy Chesna at My Sketch world!!  Check it out!!
 
And, here's my card based on the sketch!  I used Simple Stories Elementary Collection and rotated the sketch.  It will be the perfect card for when we have the opportunity to tell one of the kids' teachers how much we appreciate them!


Be sure to check out what the rest of the design team did with the sketch on the MSW Blog, or come check out the FORUM and see the sketch and all of the fun monthly challenges, as well!

Thanks so much for stopping by today!  I have lots to get caught up on, so I hope you'll stop by again soon!

Sunday, September 2, 2012

More September Kit FUN!

Hey, everyone!  Today I get so share some more fun projects from the September Kit!

First up, my sweet Duffy, the famous Goldendoodle who has stolen our hearts. We had taken a hike on Mackworth Island (just off the coast of Portland, ME) and took a break for the kids to wade in the water before heading home. Duffy had been with us the whole time and didn't want to leave my side while sitting on the beach, but never took his eyes of the kids, either.

One of my favorite parts of this page is the butterfly. I used some Cinnamon colored Stickles to create the flight trail. First I put dots with a pencil to create the pattern I wanted and then put dots of Stickles over the pencil marks to create the trail. I also used the Stickles on the top corner to help tie the page together.

The Glubers are such a fun part of this month's kit! They are really known for how easy it is to make a ribbon flower, so that's just what I wanted to do. And, the ribbon in the kit is just gorgeous!! The green ribbon has a beautiful sheen to it. I simply moved the ribbon around the Gluber to create the flower and then used a chipboard piece from the kit Extras as my flower center.  You can read on the BOAF Blog more about how I created the frame!


Thanks so much for stopping by the BOAF Blog today!! Make sure you come back to see what the other Design Team members are doing with this beautiful kit!!