Tuesday, November 12, 2013

Accoridon Star Tutorial

Hey, there everyone! Here's my post that just went up on the BOAF Blog today! Thanks for visiting!

Today I want to share a fun accordion star that would be great for the front of a card (Christmas, birthday... you name it!) or to add dimension to a layout or other project!  This is a Pinterest Inspired project from this blog.
First, make a template using a piece of thick cardstock or thin cardboard. Cut a strip 1 3/4" by 6". Then, draw a horizontal line 1" from the top of the strip. Then, mark at 1 3/16", 2 3/8", 3 9/16" and 4 3/4" as shown below.

Now, connect the marks as shown:

And, cut along the lines so that it looks like this:

Now, to make the star, start with a piece of patterned paper cut 1 3/4" by 12". Fold the strip in half (so that it's now 6" long. Place the template on the strip and trace. be sure that the fold of the paper is to the RIGHT side of the template. It should look like this.

Now, cut along the line and unfold your strip.

Then, using a score board and scoring tool, score at every 1/4" the entire length of the strip and accoridon fold it.

Now, adhere the ends of the strip together and punch a circle from scrap paper to use for gluing the star down.

And, now for the big moment.... gather the straight edge of the strip together and push down toward the center. Glue it down with a strong ahesive (I reccommend hot glue). Adjust quickly so that the small circle in the center of your star is even and that the points are as even as possible.

Now, simply add the star to your project!

I bet you hadn't thought of the November kit working great for Christmas cards, did you?! I love how the gold and blue of the kit extras work so beautifully together for this card! There's still a few kits and plenty of extras left! Be sure to check out the BOAF Botique to get yours today!

I hope you liked the tutorial today! I can't wait to see what you do with it! Thanks so much for stopping by today!

Wednesday, November 6, 2013

Halloween Treat Boxes

Hey, everyone!!
Here's a post I shared last week on the AWDML Blog (before Halloween!).  Thanks for checking it out!

Happy Scrappy Wednesday, Everyone!

Today I have some fun (and easy!) Halloween Treat Boxes to share with you! These would be perfect for whipping up a large batch for your kidI did three different designs, but they all started the same:
First, cut a 3" by 8 1/2" strip of cardstock. I used black. Then, score it at 3", 4" and 7". Fold on all of the score lines and then you'll have this:


And the front....

 
Now, the fun part-- to decorate the front! For this one, I used my oval dies to create a little pumpkin, I hand cut the stem and the "curly Q" is just a thin strip of cardstock that's been wrapped around a pencil. Cute, eh?


Here's little Frankie! I simply hand cut the "fringe" for his hair, used a small circle punch for his eyes, and drew the rest with a black marker!


I also created a ghost at the last second, but forgot to snap a photo just of him. I started with a 3" by 3" square of white and hand cut the shape of the ghost. Then circle punched the eyes and mouth using two different sized circle punches.

Here are all of the treat boxes together. When I attached the "characters" to the fronts of the boxes, I only put adhesive on the top 1/3 so that they would stick only on the top flap of the box. So, if you lift up on the character, the box will open to reveal the Halloween treat inside!

I'm already cooking up a Christmas version of this project! Stay tuned for that! Thanks so much for stopping by today! I hope you enjoyed the project!

Saturday, November 2, 2013

November Kit from Birds of a Feather!

Here's my reveal that was just shared on the BOAF Blog!

I know, I know... I say it with every kit, but really-- it's TRUE!! The colors, textures and patterns are just gorgeous! Amy has such a fantastic sense of how to put together the papers and embellishments!

When I first looked at the kit, I thought it was pretty feminine and started thinking of photos of my daughter that I could use. But, then I decided to challenge myself to make a masculine layout. I took a cute photo of my son in the leaves just yesterday. Since he was wearing a bright green shirt, I flipped it to black and white so that it would work with the colors.


The background paper, the banner pieces, the date stamp, the glittery stickers and the word "ten" (cut from a 12X12 sheet) are all from the November Extras. Amy has fantastic kits but incredible add-ons as well. I can never resist getting all of them!

I knew that I wanted to add a pop of color in there and by layering two banner pieces together, I was able to get the pop of color I wanted as well as some fun dimension. You can also see the fun date stamp here!


I had fun creating the title, but I also used the journaling spots from the kit to make a scalloped border along the top of the page for some added interest. Each journal spot is actually a small stack of papers that you peel off one at a time! So, I just cut a few in half and slid them under the paper. I also cut the star out of one of the patterned papers and adhered it with foam tape.


I also made a simple card to share with you today! The "HELLO" was cut from one of the patterned papers with the kit. I added some fun black bling from my stash to make it a little more flashy. I love the way the black and pink really pop!


I hope you enjoyed my reveal today and that you'll be sure to check out the November 2013 BOAF Kit AND all of the Extras! You will not regret it... ever! Thanks so much for stopping by today!

Wednesday, October 30, 2013

Snowman Ornament

Hey there, everyone!!  Here's a project I shared on the AWDML blog last Wednesday!

I have a super easy and fun Snowman Ornament to share with you today! It would look cute on the front of a card, too!

Start with a strip of paper about 1 3/4" wide and 12" long. Punch the edge of your strip with a scallop edge punch.


Now, using your scoring board, score the strip at every "indent" in the scallop. If you don't have a scallop punch, score at every 1/4".

Accoridan fold your strip and punch a circle from a piece of scrap paper.
 
 
Now, glue the ends of your strip together, Press it down in the center to create a rosette and secure with hot glue.
 
Now, simply decorate your snowman with a hat, eyes and nose. I decorated the hat with a scrap piece of ric-rac, some punched branches and some paint to make the holly berries. Just a hint-- add the berries at the VERY end of your project. Otherwise, you may end up dragging your hair through it and then trying to fix it (in my case you may repeat the scenario THREE times!). Also, add a piece of twine, ribbon or craft wire to the back of your snowman to hang it from.


Isn't he super cute?!?! One of my favorite parts of this project is that every single piece of paper used was a scrap! The ric-rac and twine were also scraps! I love when you can create something cute with scraps!

Thanks for stopping by today! I have another cute snowman to share with you soon, so make sure you come back!

Wednesday, October 23, 2013

Make a Wish

Here's a project that I shared on the AWDML Blog last week!

Happy Scrappy Wednesday, everyone!! And, Happy Birthday to A Walk Down Memory Lane!!
To celebrate this fantasic milestone with AWDML, I have a fun and simple birthday layout to share with you today! To a child, there's nothing like blowing out the candles on your cake and making a wish every year! Today's layout features my son at his birthday last year. His next birthday is in just TWO days! I did a few fun things with this one... take a look!

 
In my title, I mixed up the alphas, which I LOVE to do, but I also added a candle in place of the "I". To make the candle, I simply rolled a strip of paper about 4" long into a tube with a small bit of embroidery thread inside for a wick. Then, just a bit of cardstock cut with a circle cutter for a flame! Isn't it super cute?! You can also see some of the Maya Mists paint splatters-- They remind me of confetti!
 
 
And, I also used a Project Life journaling card for my sub-title! The PL Cards are perfect for this type of use! They are so easy to alter and quick to put together!
 
 
Thank you so much for stopping by to celebrate with us! And, here's to MANY more wonderful years for AWDML! Congratulations, Lisa!

Tuesday, October 15, 2013

So Thankful for the October Kit!

I know I say this about every BOAF kit, but seriously.... I LOVE this kit! It's so beautiful....even more beautiful in person and it's more beautiful every time I play with it! The papers work so beautifully for so many projects-- not just fall ones!

Today I want to share a layout that I made about our trip to Plimoth Plantation this summer. If you've never been there, it's a living history museum where you get to tour a working Pilgrim settlement where there are people who are completely in character as though you just stepped back into the 17th Century! We had so much fun chatting with everyone and seeing everything!


Here's a close-up of the journaling:


And here, you can see all of the photos I used! Since I am usually a "one photo" scrapper, it was a challenge for me to use so many photos, but I really like how this "film strip" idea worked!


I also have a card to share today. This kit is perfect for making gorgeous Thank-you cards!

Thank you so much for stopping by! I hope you are inspired to dig into your October kit! And, if you don't have one, there's ONE left in the store! Don't miss it!

Sunday, October 13, 2013

BOAF & Blue Fern Blog Hop!


Hopefully, you have been directed here from Janet's Blog.  If you haven't, please head back to the Birds of a Feather Blog and start hopping from there.  Remember, in order to qualify for the prize, you MUST hop to and comment on each Scrap Chick's blog.
Here's my project using the awesome Blue Fern Studio's chipboard and the BOAF October Kit!
 
This chipboard is FANTASTIC!  Not only is the design beautiful, but it's sturdy enough to work with it without fear that it's going to fall apart  Even though I didn't ink this one, I have used ink on other Blue Fern chipboard, and it takes ink beautifully!  Here's a close-up of the title I used!  Isn't it gorgeous?


Thanks so much for stopping by!  Now you need to hop over to Shawna's blog for the next project! 

Before you go, since this weekend is the Birds of a Feather Bird-day Crop, and since we are celebrating three amazing years, Amy has a special gift to offer you:
All hoppers can receive 10% off your Blue Fern order if you order through BOAF by the crop deadline, Wednesday the 16th. All you need to do is send Amy a private message via the message board OR the gallery, or send an email to birdsofafeatherkits@gmail.com .

Thanks again for stopping by my blog today and for playing along in our blog hop!  I hope you'll come back soon!

Tuesday, October 1, 2013

Technique Tuesday: Super Easy Oval Bows

Here's my post that I shared today on the Birds of a Feather Kit Club Blog!

First of all, I just need to tell you how amazing the October Kit is! Every kit is my favorite... until the next one comes out! The papers, the embellishments, the alphas, the extras.... everything! **sigh** It's just amazing!

A few weeks ago, I shared a card with a super easy bow and had a few people ask me to share how to make it. Well.... here it is! It's so easy! Not only are these bows great for cards, but I can see them used on layouts, gifts and even wreaths!

First cut four ovals-- two slightly smaller than the others. I used my oval die set, but you can always make a template with your word processing program, or cut them on your die cutting machine. The bigger the ovals, the bigger your bow will be.


Now, using a strong adhesive, bend (don't fold) the larger ovals in half and stick the ends together. I used some super sticky glue squares, but hot glue would also work. You could use wet glue if you're more patient than I am.

Now, cut matching notches in the ends of the two smaller ovals.


Stick your two folded ovals together and wrap a coordinating paper around them.

Next, simply add your two smaller oval to the back side of your bow and that's IT!!

You can leave it as is, or add a jewel like I did!

Now, add your bow to your project and enjoy!

I hope you enjoyed my tutorial today and that you'll try it on an upcoming project! And, of course, don't forget to check out the October Kit! The word GORGEOUS doesn't even come close....

Have a great day, everyone!  Thanks for stopping by!

Wednesday, September 25, 2013

Mason Jar Lanterns

Hey there, peeps!  Here's a fun tutorial I shared on the AWDML Blog last week!

Happy Scrappy Wednesday, everyone! Mason Jar crafts are all the rage right now and today I want to share how to make some Mason Jar Lanterns!! This is a great project to involve the kids on, too!

Check this out!


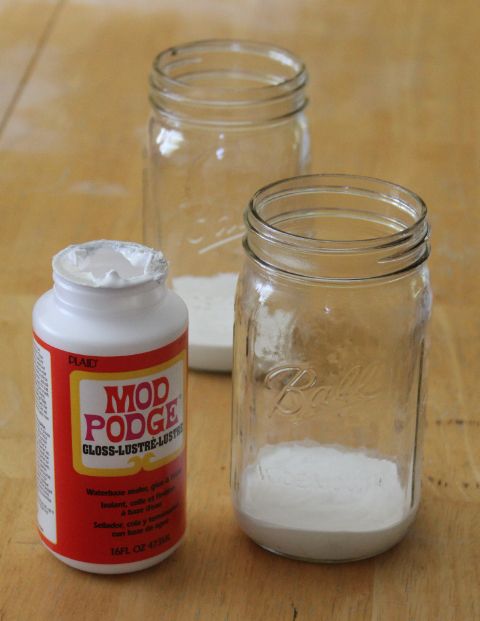
First I started with my quart size mason jars, mod-podge and food coloring. You'll also need a plastic spoon and paper plate for each jar you plan to make.


First, put about 3/4" of Mod-Podge into the bottom of your jar.


Now, add your food coloring. To make Orange, we used about 6 drops of red and 6 drops of yellow.


Use a plastic spoon to stir the food coloring into the Mod-Podge. Keep stirring until it's totally blended. Any streaks left will cause streaks on your jar. The color should be a pastel version of the color you are after. The color will darken up and it will dry in the color of your food coloring since the Mod-Podge turns clear when it dries.


Now, turn your jar on its side and gently roll it back and forth to distribute the colored Mod-Podge evenly throughout the inside of the jar.


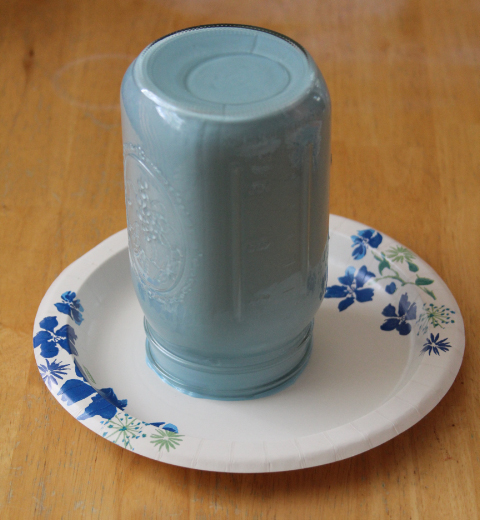
Empty out any excess and then turn your jar upside down on a paper plate. I learned that it takes a LONG time to dry this way. And, I ended up putting two chopsticks across my paper plate and setting the jar on top of them so that the air could circulate.


Here's what they look like when they are dry! Isn't that COOL?! OK, I'm not going to lie. The top of the jar is a little messed up because I tried to be impatient and turn them back upright to dry. It didn't work. But, I had a plan on how to cover that up! ;)


I decided to turn the orange jar into a jack-o-lantern by adding a pumpkin face to it using black cardstock.


The blue jar has a winter theme so, we added snowflakes to the outside.


I think the blue jar would be pretty with a garden/flower theme, too!

I love how these Mason Jar Lanterns came out and will be using them around our house for seasonal decorations. I can't wait to see what other designs I can come up with! We'd love to see what designs YOU can come up with! Share them on our Facebook page so we can ooh and aah over them!

Wednesday, September 18, 2013

Keepin' it Simple

Hey, everyone!!  Here's a post that I shared on the AWDML Blog last week!

Happy Scrappy Wednesday, everyone!! Today I want to share a layout where my mission was to use the KISS principle (Keep It Simple Stupid!). In other words, I wanted to get the basics on the page with out any added frills.

My son had the opportunity to try water skiing a few weeks ago. I had a terrible (and painful) experience with my first try at waterskiing and it was a LONG time before I was comfortable to try again. So, I was pretty nervous for him to try it. For his first attempt I was in the boat with my camera at the ready while my uncle and cousin helped him in the water. The boat took off and he came SO close to getting up. He hung on for the longest time and seemed like all he needed to do was stand up. But, alas, he ended up not quite making it. As you may be able to tell from the photos, his lifejacket was too big which may have been part of the issue.

 
 You can see that I incorporated several different patterned papers, banner-style cut papers and scalloped edges. I also matted the photos, included a title, the date, the location and the word "proud." I felt that the photos, the title and the small details told the story without needing to add journaling. Then a few simple, subtle lines around the border of the paged helped to tie everything together.
Here's a close up of the photos. I still can't believe how close he got on his first try!


Just to note: We did change his lifejacket to a better fitting one after this first try and there aren't many more photos since I was in the water helping for the next attempts (my daughter had my camer and enjoyed taking photos of a big dragon fly rather than her brother's attemts at skiing). He held on so long the first time that we were now in the middle of the lake, so I jumped off the side of the boat and helped. Those teenage years as a lifeguard came in handy!

Thanks for stopping by today! I hope you enjoyed my simple layout and are inspired to try a simple one of your own!