Wednesday, August 21, 2013

My Notes

Hey, there everybody!  Thanks for stopping by today!  Here's the project that I shared last week on the AWDML blog!

Today I have another super easy project that is incredibly versatile and can be used for tons of different occasions! I'm making a notebook for my daughter, but it could be a teacher gift, a mini-album and lots of other things!

First I cut a front and back using my largest die from the Nestibilities Labels One set and Kraft cardstock. You could make this with lots of different shapes and dies! Then, I cut 15 pages using white cardstock and the same die. Why 15 pages, you ask? Because that's how many scraps of white cardstock I had! (This is a fantastic job for a kiddo who is "dying" to scrap with you!)
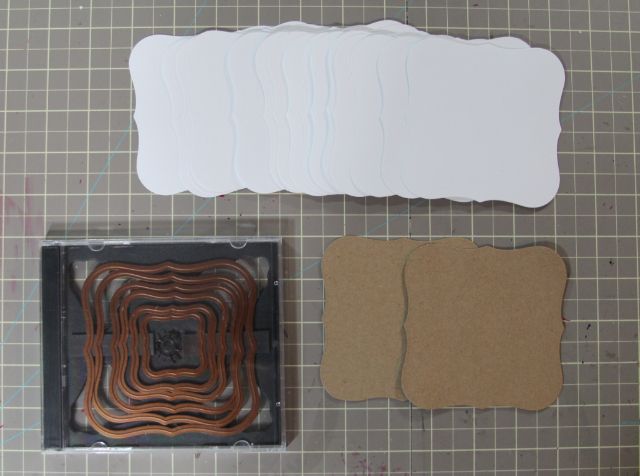
 
**Note: Check out my Spellbinders Storage system-- an empty CD case and some sticky magnet strip. Pretty genius, eh?

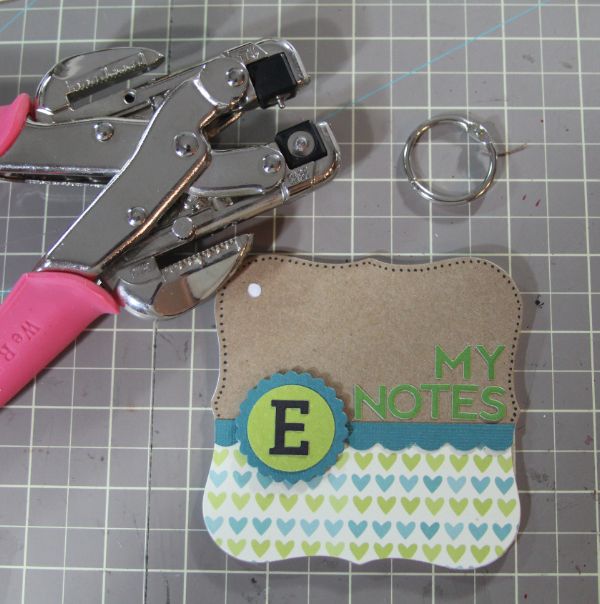
Next, I decorated the cover of my book and cut a hole using my crop-a-dile for the book ring.
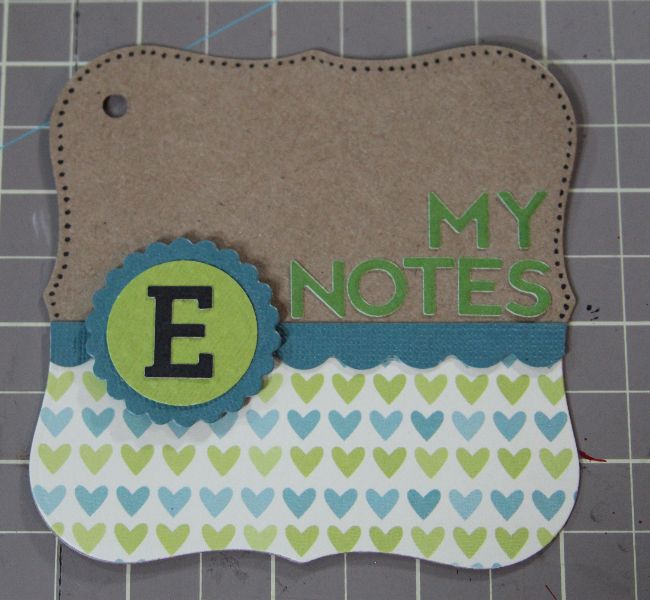
Now, I needed to cut a matching hole for each of my pages. Because I was using the crop-a-dile, I could cut several pages at once. So, I lined the pages up carefully and used the hole in the cover as a guide to cut the rest. I did about 3 pages at a time until I'd cut a hole in each. Then, I fed the book ring through the hole.
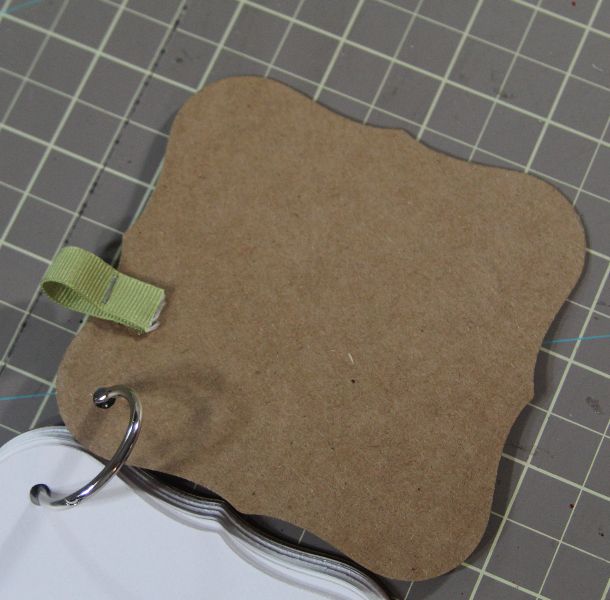
The last step was to create a simple loop for the pen! I cut a piece of ribbon and wrapped it around the pen. Then I secured ith using the tiny attacher so that it was the right size. Then, I trimmed the ribbon and used some super strong adhesive to adhere it to the back of the front cover.
Then, simply slide the pen into place and the project is done!!
 

I can picture this for SO many uses-- a journal, a coupon book for Mom (free hugs, empty the dishwasher, etc.), a teacher gift, a mini-album, shopping lists... anything!

I hope you enjoyed today's project and are excited to try one for yourself! Thanks so much for stopping by!

Wednesday, August 14, 2013

A Despicable Card...

Hey, there everyone!  Here's a card I shared a few weeks ago on the AWDML Blog.  I'd planned to get a better photo of it, but SOMEONE took it to work and TACKED it to the bulletin board.  So, well... I'm just glad he liked it enough to do that.  I'll take it as a compliment!  ;)

Today I have a super fun card to share that could be used in any number of ways… party invitations, thank you cards, just-to-make-you-smile cards, anything!

The Minions have taken over my house…and no, I’m not talking about my children. We’re talking about the ones from the uber popular movie “Despicable Me.” With the new movie just now hitting the theaters, my kids are watching them on YouTube and giggling and their silly antics all while begging us to take them to the movies.

So, inspired by my own silly minions, I was inspired to get out my circle dies and punches and create a fun Minion of my own!

 
Isn’t he SUPER cute?! My card base is a 4 1/2″ by 12″ strip of kraft paper folded in half. My yellow cardstock is 4″ wide and I traced my largest Nestibilities Circle Die to create the rounded top. I used the same set of dies to create the eye and the “glasses.” I used a circle punch to create the iris and pupil of his eye and to create his silly grin. I cut very thin strips of black to create his hair and adhered it to the back of his head with my tape runner. Since the paper is so thinly cut, it’s easy to shape it into the direction you want it to go.

The best part about this card? It was created with ALL scraps!

Now, you’re asking yourself, “What would I do with a cute Minion card?” Well, there’s lot’s of posibilities….
–a themd kids’ birthday party invitation
– a Thank You card… “What would I do without YOU as my Minion?”
–a get well card… “Ma-na-ba-ba-woo-woo means Get Well Soon”
– a belated birthday card… “I’m Despicable for forgetting your birthday.” (Give your minion a sad smile for this one!)
– How about a baby card…. “Congratulations on the arrival of your new little Minion!”

The possibilities are truly endless with this little guy! Have fun!

Thanks so much for stopping by today!  I hope you're inspired to let the Minions take over your scrappy space!

Saturday, August 10, 2013

Tulip Card Tutorial

Hey there, everyone!  I was looking back at some of my favorite projects this year and found that I never posted this one here on my blog!  I made this for my mom for Mother's Day.  I'd put off posting it until after she saw it in person and then totally forgot to come back and share!  So, here you go!

Happy Scrappy Wednesday, everyone!! With Mother’s Day right around the corner, I wanted to share with you a simple, but beautiful (if i do say so myself) card that would be perfect for Mom, or can easily be changed to suit many different occasions. And, the tulips are in full bloom around here, these days so I was inspired!

First, I created my card base and then I cut nine ovals using my Lifestyle Crafts Nesting Oval Dies. I decided to make all of my tulips yellow, but they would be pretty in any color!
 
Then, I cut some foam tape into a shape and size similar to my ovals. I adhered the tape to the back of what will be the middle oval/petal of my flower. Then, I added my two other ovals on either side of the middle petal to create my tulip shape.
 

Here is what my three tulips look like once they are all assembled.
 

Then, I added my tulips to my card and added a few final touches. Simple, but sweet!

Thanks so much for stopping by today! I hope you enjoyed my card and that you’re inspired to try one of your own! I think I’m going to make a few of these as thank you cards for the kids’ teachers this year!
Have a fantastic week!

Wednesday, August 7, 2013

My Loves

Hey there, everyone!!  Here's the layout and post that I shared on the AWDML blog last week!

Happy Scrapy Wednesday, everyone! I hope you're having a fantastic day on this last day of July. Today I have a pretty layout to share with you!

Last week, my friend Patty who is a wonderful photographer took some gorgeous photos of my kids and Duffy. She was sweet enough to give me all of the photos to scrap and I couldn't be more happy! She's the best! So, today I have the first of the series of photos that she took. I really wanted to create a clean, crisp, bright layout that captured the beauty of my kids and the location that is just down the road from my house.

I love the yellows, blues and and greens in Lily Bee's Sweet Shoppe collection and thought they would be perfect for this layout!


I rarely break out the needle and thread to hand stitch, but I really wanted to keep the simple look going on this layout. To make the heart shape, I cut out a large heart with my cricut and then traced around it with my paper piercer to create the pattern for the stitching.


The center of the large flower is a wooden button that is part of the Sweet Shoppe Collection. The yellow pearls are actually regular pear accents that I quickly colored with a Copic Marker! I also colored the "MY" in the title with the same marker! Copics make it SO easy to have perfectly matching accents in a matter of seconds! Here's a closeup of one of the flowers so you can see the center.
 
I hope you enjoyed my layout today and some of the tricks that I used to create it! I hope you're inspired to dive right into your scrappy goodies! Thanks for stopping by!  Be sure to check out AWDML for all of the supplies used to create this layout and SO much more!!