Wednesday, September 25, 2013

Mason Jar Lanterns

Hey there, peeps!  Here's a fun tutorial I shared on the AWDML Blog last week!

Happy Scrappy Wednesday, everyone! Mason Jar crafts are all the rage right now and today I want to share how to make some Mason Jar Lanterns!! This is a great project to involve the kids on, too!

Check this out!


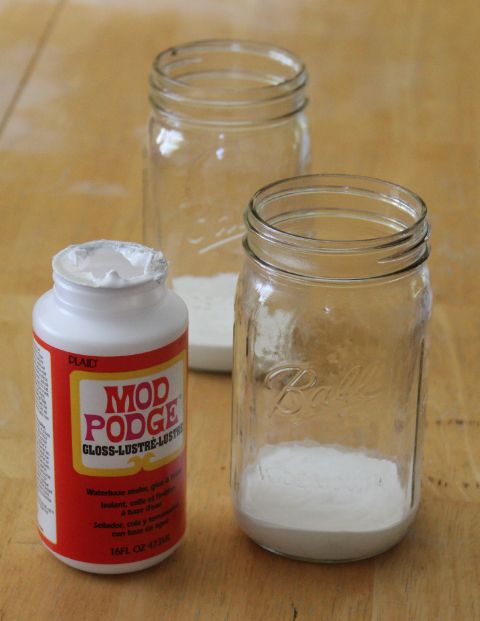
First I started with my quart size mason jars, mod-podge and food coloring. You'll also need a plastic spoon and paper plate for each jar you plan to make.


First, put about 3/4" of Mod-Podge into the bottom of your jar.


Now, add your food coloring. To make Orange, we used about 6 drops of red and 6 drops of yellow.


Use a plastic spoon to stir the food coloring into the Mod-Podge. Keep stirring until it's totally blended. Any streaks left will cause streaks on your jar. The color should be a pastel version of the color you are after. The color will darken up and it will dry in the color of your food coloring since the Mod-Podge turns clear when it dries.


Now, turn your jar on its side and gently roll it back and forth to distribute the colored Mod-Podge evenly throughout the inside of the jar.


Empty out any excess and then turn your jar upside down on a paper plate. I learned that it takes a LONG time to dry this way. And, I ended up putting two chopsticks across my paper plate and setting the jar on top of them so that the air could circulate.


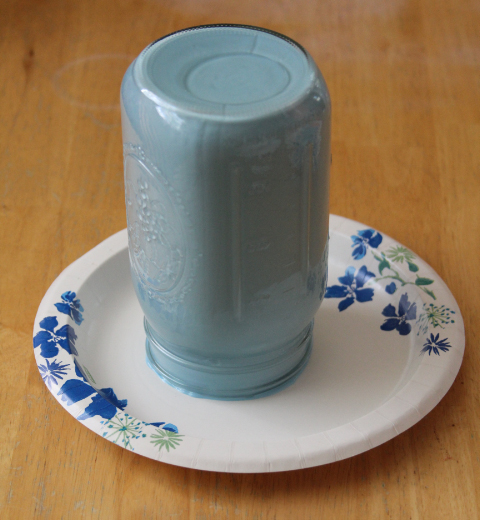
Here's what they look like when they are dry! Isn't that COOL?! OK, I'm not going to lie. The top of the jar is a little messed up because I tried to be impatient and turn them back upright to dry. It didn't work. But, I had a plan on how to cover that up! ;)


I decided to turn the orange jar into a jack-o-lantern by adding a pumpkin face to it using black cardstock.


The blue jar has a winter theme so, we added snowflakes to the outside.


I think the blue jar would be pretty with a garden/flower theme, too!

I love how these Mason Jar Lanterns came out and will be using them around our house for seasonal decorations. I can't wait to see what other designs I can come up with! We'd love to see what designs YOU can come up with! Share them on our Facebook page so we can ooh and aah over them!

Wednesday, September 18, 2013

Keepin' it Simple

Hey, everyone!!  Here's a post that I shared on the AWDML Blog last week!

Happy Scrappy Wednesday, everyone!! Today I want to share a layout where my mission was to use the KISS principle (Keep It Simple Stupid!). In other words, I wanted to get the basics on the page with out any added frills.

My son had the opportunity to try water skiing a few weeks ago. I had a terrible (and painful) experience with my first try at waterskiing and it was a LONG time before I was comfortable to try again. So, I was pretty nervous for him to try it. For his first attempt I was in the boat with my camera at the ready while my uncle and cousin helped him in the water. The boat took off and he came SO close to getting up. He hung on for the longest time and seemed like all he needed to do was stand up. But, alas, he ended up not quite making it. As you may be able to tell from the photos, his lifejacket was too big which may have been part of the issue.

 
 You can see that I incorporated several different patterned papers, banner-style cut papers and scalloped edges. I also matted the photos, included a title, the date, the location and the word "proud." I felt that the photos, the title and the small details told the story without needing to add journaling. Then a few simple, subtle lines around the border of the paged helped to tie everything together.
Here's a close up of the photos. I still can't believe how close he got on his first try!


Just to note: We did change his lifejacket to a better fitting one after this first try and there aren't many more photos since I was in the water helping for the next attempts (my daughter had my camer and enjoyed taking photos of a big dragon fly rather than her brother's attemts at skiing). He held on so long the first time that we were now in the middle of the lake, so I jumped off the side of the boat and helped. Those teenage years as a lifeguard came in handy!

Thanks for stopping by today! I hope you enjoyed my simple layout and are inspired to try a simple one of your own!

Monday, September 16, 2013

September Kit Sweetness!

Here is my post that is on the Birds of a Feather Blog today!

The September kit is SO worth the wait! The colors, the patterns, the embellishments-- everything-- is so fantastically put together! I love that I use things I wouldn't normally choose for myself!

Today I have two projects to share with you!! First a layout. Not just any layout-- a back to school layout! I really enjoyed cutting into the gorgeous papers and using the fun embellishments like the stitched elements in the top right hand corner and the die-cut arrow from the kit extras!

Here's a closeup of the tite. I used some chiboard from my stash that I colored with a Copic Marker. Then I added some alphas that I had kicking around and a heart from the package of super fun wood embellishments from the kit extras.

The kit has some beautiful flowers that have lots of great ways to layer them together. For my flower center, I used the flower from the one of the clips in the kit. I think it worked perfectly together!

I also made a card that is made mostly from the paper in the kit extras. I couldn't resist this amazingly gorgeous Authentique patterned paper and the die-cut was perfect for stamping on my sentiment. The bow was made using oval dies! Maybe I'll have to share a tutorial on how to do it!

I hope that you enjoyed my projets today. If you don't have your September kit yet, DON'T WAIT! There's only a few left in the store! If you have your kit, but not the extras yet be sure to check them out HERE. They are so much fun!

Be sure to check the BOAF Blog often to see more reveals using this fantastic kit from our uber talented design team

Wednesday, September 11, 2013

Busy Background Fun

Here's a post that I shared on the AWDML Blog last week!

This weekend, I was scrapping some photos that I took last weekend at our long-overdue family reunion and decided to challenge myself to do two things: use a busy background and use something that I've had in my stash for more than 6 months. And, I was able to accomplish both goals! Mostly I want to share how I tamed the busy background paper.

First of all, busy background paper is always a challenge for me. I tend to shy away from it and choose cardstock or cute little patterns. In order to tackle this paper, I decided to create some neutral space in the middle where I would concentrate the majority of my layout. I essentially created a layout that is roughly 8"X8" and put that in the middle of the background paper. I also used a photo that was a slightly contrasting color pallete to the paper line so that it wouldn't be lost on the page. I think it was relatively successful!


Here's a look at the title strips I made with a label maker and some of the fun elements I added from the sticker sheet that matches the line of paper!


And, here's a peek at the title work. I love to create mixed up titles! The word "summer" is from the sticker elements sheet and then I just added some Thickers around it to create the title.

I hope you enjoyed this layout today and that you feel a little more comfortable tackling a busy background paper!

Thanks so much for stopping by today!  Stay tuned for more great scrappy projects coming up SOON!

Sunday, September 8, 2013

Embossing Glitter!

Here's a technique I shared on the BOAF blog last week.  That's RIGHT!  I was invited back to the DT there and I'm SO excited!!

Hey there, everyone! My first official post as a scrap chick this term is a fun and easy technique to incorporate glitter into your cards! One of the things I hate about using glitter on a card is the fact that it comes off. It's pretty to look at, but by the time it's packaged up, mailed and recieved the glitter is smooshed all over the card... or it's gone! Well, today your glitter troubles are over! The solution? Embossing!

First, mix your glitter with CLEAR embossing powder. You have your ratio right when the color of the glitter seems slightly lighter.

Now, stamp your image, or in this case your card sentiment, on to your cardstock using embossing ink.


Cover the stamped image in your glitter/embossing powder mixture and tap off the excess.


Now, simply heat with your embossing/heat gun until the embossing powder. You will notice that the glitter becomes slightly more shiny when it is set. The difference is very subtle, so watch it carefully so you don't burn it.


 Now, just finish your card as you would with a "normal" stamped image or sentiment!


I love the idea of using this technique with red or gold glitter for a Christmas card! I can't wait to try it! I just couldn't bring myself to make a Christmas card in August!

Thank so much for stopping by today! I hope you enjoyed the project and are inspired to try one for yourself! Be sure to check out the Echo Park Hello Summer collection that I used for this card in the BOAF Boutique!