Saturday, March 24, 2012

Mister Cool!

I have SO loved playing with the new Echo Park A Boy's Life collection!  All of the blue papers make me so happy!  It's SO hard to find great "boy" papers and Echo Park has nailed it this time!

This layout was made using a sketch by Lucy Chesna for the AWDML Newsletter!


This card was made with the same line and some fabulous SRM stickers

Thanks so much for stopping by today!  I hope you were inspired!

Wednesday, March 21, 2012

Clutter Crusher Magnets!

Here's a project that I shared on the Momenta blog earlier this week!

Our refrigerator has a habit of collecting stuff... LOTS of stuff. Between the school lunch menu, our menu, the ever present (and growing) shopping list, the kids' artwork and photos of those we love, it always is a mess. So, I needed a way to start organizing (and limiting!) the items that are going to be displayed there. I decided that magnets were the way to go!

First, I stopped at the "home improvement store" just down the road and picked up a square of ceramic tiles. They were all connected (for ease of putting them on the wall, i'm sure), but were on clearance for $3.00. And there were enough to make 16 magnets! (Dear friends who are reading this, you will be receiving magnets for your next birthday....and Christmas!).
Here's what you need:

Ceramic Tiles, Xyron (or strong adhesive), Squares of your favorite Momenta paper (for these tiles, I used paper that was 1 3/4" square), Mod-Podge, paintbrush, magnets, chipboard and/or stickers, sandpaper, craft knife (not pictured).

First, break apart your tiles. It's easy, just bend and pull. Easy peasy!


Now, you need to remove the gummy stuff that held the tiles together. Just a quick swipe of your craft knife and a few swishes of the sand paper and it's gone!


See, they're all pretty now!


Now, run your pre-cut Momenta papers through a Xyron, or apply a strong adhesive to the back and apply to your tiles.


Once all of the tiles are covered with paper, put a nice layer (or two, or three) of Mod-Podge. It dries really quickly, so just grab a quick snack and you'll be ready to go!


Now, it's time to add what you want to the front of the magnet. I added mine while the Mod-Podge was still tacky just to help hold the stickers on for ever and ever. I made one for the school lunch menu (eat), one for our menu, the to-do list, the shopping list, and E for my daughter's creations, a C for my son's creations, and a few hearts to display those we love!
Finally, just add the magnet strips to the back! These are just peel and stick! **Note: I ended up adding a third strip of magnet because of the weight of the tile.


And, display on your refrigerator to keep things organized and tidy!


Momenta Products Used:
PK-2383 Kalideoscope Pyramid Pad
ST-4491 Pastel/Glitter Treatment Alphabet Sticker Kit
ST-3190: BW Med Dot Puffy Alpha
ST-2398: Vib Metal Chipbd Alpha
 
Thanks for stopping by today!  I hope you were inspired!

Monday, March 19, 2012

Just Dance!

My daughter LOVES to dance! She's always on the move and nearly every pass down the hallway or through the yard includes a twirl, or two. Throughout her years of dance, her costumes have run the gammet from frilly to funky, but she never seems to get into any other "character" but her own. I love that about her!

This "Just Dance" paper from the Girls Rule Collection from Scrappin' Sports & More is perfect for so many occasions. I love that it has a black and white color scheme so that no matter the color of the photos, the paper will fit it perfectly! Together with some cardstock, ribbon, bling and chipboard stickers from my stash, and the layout came together quickly, and beautifully!

Here's a closeup of the title. Believe it or not, the words "Just Dance" are a part of the paper! I just added the butterfly and a little bling-- after all, no dance layout is complete without some bling!
Products Used:
#1388- Girls Rule: Just Dance
Thanks so much for stopping by today! I hope you were inspired!

Friday, March 16, 2012

Momenta and Purple Cows!

Oh what a week this has been with the fantastic partnership between Momenta and Purple Cows! I am excited to share my projects that are on the Momenta Blog today!   Be sure to visit the Momenta Blog for information on how to win a fantastic prize!!

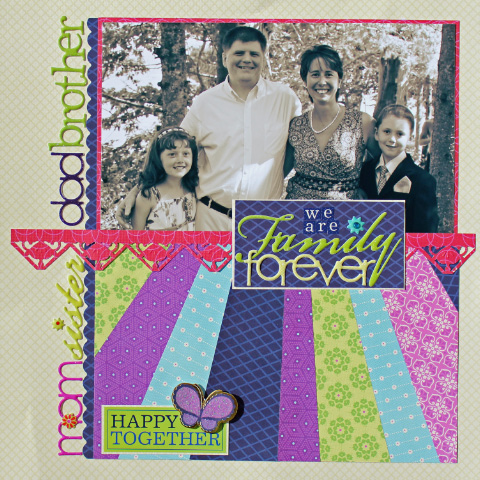
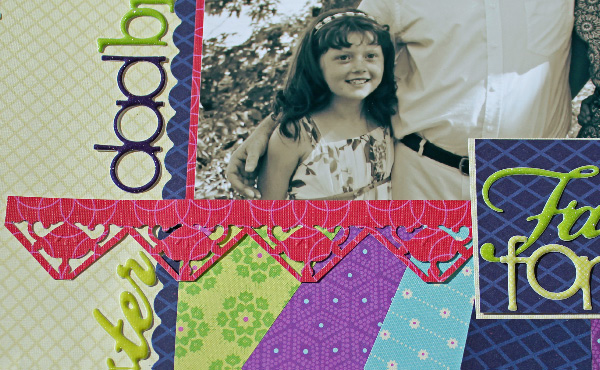
First up is a layout that I made using the awesome "Punch It" tool from Purple Cow's Craft Geek line. I got the really cool "Summer Punch." Not only is it easy to use, it has a ton of possibilities and can punch anywhere on your page thanks to the fabulous design. I love how this one also has a bit of embossing included in the design.

To make the punched strip, I simply lined up the punch and went across my paper in a straight line. Then I trimmed out the strip with a pair of scissors to leave me with the fabulous design you see here.


Next up is the "Pin It" tool. This thing works like a charm! The designs of the pins are super cute and come in a variety of metallic finishes. On the card you see here, I used the pin that looks like intertwined scalloped hearts and tried to mimic the pattern of the pin with my papers. I like how the pin joins my two paper hearts together. I was a little leary of how well it would punch through multiple layers of paper, and I was very impressed with how easily it works. And, again, because of the ingenious design, you can pin your piece anywhere on your card, layout or project!

See how the pin looks up close?

And, here it is on the completed card! I love how the pin adds dimension and shine, and gives the card a finished look!

Thank you so much for stopping by today! I hope you were inspired!

Momenta Products Used:
PA-2240- Family Forever 12X12 Premium Paper Pad
ST-4838- Family Forever Sticker Kit
ST-4791- Puffy Title Stickers Family Forever Glitter Treatment

Purple Cows Products Used:
Pin it #7000
Punch It- Summer #7203

Tuesday, March 13, 2012

Go ahead- Be Negative!

Sometimes it's hard to stay positive when you are around a lot of negativity.  So, I'm going to share you how to turn a negative into a positive.  Negative SPACE, that is!!

If you like what you see here and would like to try it for yourself, I encourage you to enter it into the challenge on the AWDML Blog!  There are fabulous challenges and a great sketch contest that you have until the end of this month to enter!  Check it out HERE!


For all of these cards, I started with plain white cardstock and cut a heart out of it with my Cricut.  I then removed the cut heart and worked with the paper left behind-- the negative space.  I matted it, and popped it up with some foam tape for dimension.  Here's where it gets fun!  I used 4 different techniques to back the negative space left by cutting the hart.  In the first example, I simply used some brightly colored patterned paper (from Echo Park!). 

In the next example, I used some basic blue cardstock which I ran through an embossing folder.

Next comes some twine!  I simply ran a bunch of ahesive along the card base and worked the twine back and forth until it covered the amount of space that would show through the heart.  I love how it turned out!

And finally, I covered a portion of the card base in liquid adhesive and fit a bunch of red buttons on to the space that will show through the heart.  I love the interest and dimension that this technique creates!

Again, I encourage you to celebrate A Walk Down Memory Lane's 9th Birthday with us and check out the challenges and contest on the AWDML blog!  And, of course, make sure you check out all of the goodies in the STORE while you are there!

Thanks for stopping by today!  I hope you were inspired!

Thursday, March 8, 2012

Laces OUT!

I saw some really fun cards on the Fiskars website a while back and it was a fun idea that I tucked into the back of my head. I knew I could adapt it to make some fabulously simple and cute cards with Scrappin' Sports & More papers!
These cards are perfect for a party invitation, a thank you for the coach, or even something sweet for your football fan ("I get a kick out of you....").

Here's how I made the laces....

First, cut a strip of cardstock about 1 3/8" wide. Then, punch one side with your Notebook Edge punch (mine is from EK Success).

Then, flip the strip of paper around and punch the other side. Try to match the notches up as best as you can.

Then, using a sharp pair of scissors, cut the "nubbies" off.

Do the same on the other side and you have perfect football laces!

Just affix them to the front of your card made with some Scrappin' Sports football papers and you have a super sweet, simple card! Isn't it so cute?!?!
Products Used:
#1330- On the Edge Sports: Soccer
#1373- Title Sports: Football

Thanks so much for stopping by today! I hope you were inspired!

Tuesday, March 6, 2012

Congratulations to.....

Thank you to everyone who stopped by during the A Walk Down Memory Lane blog hop!  Your comments were so sweet and very appreciated!

Congratulations to the winner of the $5 Gift Certificate, Me-Ma-Kim!

Please email me at nwise(at)metrocast(dot)net with your email address so we can get you your Gift Certificate!

Be sure to visit the AWDML Blog for fun challenges and a sketch contest!  The party is still going strong!!

Thursday, March 1, 2012

Happy Birthday to A Walk Down Memory Lane!


Happy 9th Birthday to A Walk Down Memory Lane!! 
We are celebrating today with a blog hop so you can get to know our Design Team!


I am so happy to part of the design team again!!
A little about me: 
My name is Nicole Wise.  I live in Southern Maine with my husband, two kids and two dogs.   They are the main reason I scrap.  I love to scrap the funny moments and how they grow and change, as well as the activities we do as a family and that the kids participate in.  During the day, I am a Middle School Music Teacher.  I am in my 14th year of teaching and, while I am super excited when summer rolls around, I do love teaching!  The kids are really fun and keep me entertained every day. 
I have been scrapping for about five years.  In the past few years, it has truly grown into an obsession that I am thinking about all the time, and I am enjoying my roles on several design teams.  I am always looking for fun ideas to use in my scrapping and I enjoy surfing the internet to find interesting things to use and techniques to try.
Besides scrapping, I enjoy toting my kids to dance class, soccer, baseball and karate, as well as playing outside with them in our fun yard.  So, I have lots of opportunities to take photos of them doing fun things to scrap!

We are sharing our favorite projects that we have made in the last few months at AWDML, so after lots of hemming and hawing, I decided that my favorite is the emergency sewing kit that I made from a Sucrets tin and some fabulous Jillibean Soup papers!

Isn't it so cute?!  It sits proudly in my desk at school for when I lose that inevitable button, or even for when someone needs a safety pin.  It's already come in handy a few times!

I used lots of great products from AWDML to make this:
Jillibean Soup Homemade 6- Bean Soup Stickers
American Crafts Cardstock

I have a great giveaway for someone who leaves a comment my blog. One lucky person will recieve $5 Gift Certificate to A Walk Down Memory Lane!! The deadline to comment and enter your name for the Gift Certificate is March 2nd at 11:59PM EST.  I will post a winner on March 3rd, so be sure to become a follower of my blog so you can  find your way back to see if YOU are the winner!

When you are done checking out all the blogs then head back to AWDML Blog  and check out the new contest that is going on. One lucky winner will recieve $25 GC to the AWDML store!!  We have some exciting new changes and alot of fun coming soon!

The next stop on today's hop is Suzanne Spokus' blog!

Thank you so much for stopping by today!  I hope you were inspired!