Friday, March 16, 2012

Momenta and Purple Cows!

Oh what a week this has been with the fantastic partnership between Momenta and Purple Cows! I am excited to share my projects that are on the Momenta Blog today!   Be sure to visit the Momenta Blog for information on how to win a fantastic prize!!

First up is a layout that I made using the awesome "Punch It" tool from Purple Cow's Craft Geek line. I got the really cool "Summer Punch." Not only is it easy to use, it has a ton of possibilities and can punch anywhere on your page thanks to the fabulous design. I love how this one also has a bit of embossing included in the design.
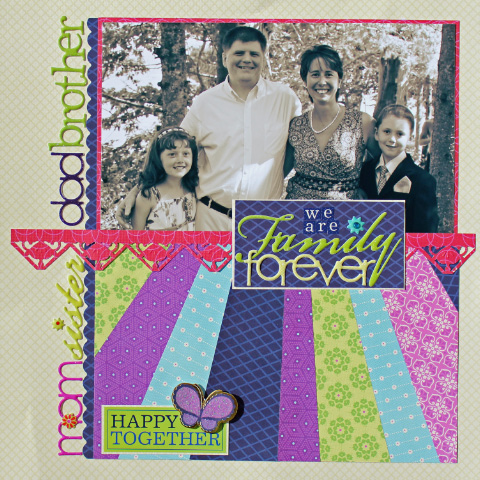
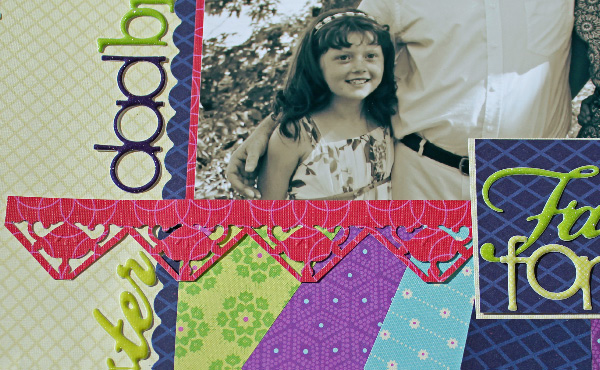
To make the punched strip, I simply lined up the punch and went across my paper in a straight line. Then I trimmed out the strip with a pair of scissors to leave me with the fabulous design you see here.

Next up is the "Pin It" tool. This thing works like a charm! The designs of the pins are super cute and come in a variety of metallic finishes. On the card you see here, I used the pin that looks like intertwined scalloped hearts and tried to mimic the pattern of the pin with my papers. I like how the pin joins my two paper hearts together. I was a little leary of how well it would punch through multiple layers of paper, and I was very impressed with how easily it works. And, again, because of the ingenious design, you can pin your piece anywhere on your card, layout or project!

See how the pin looks up close?

And, here it is on the completed card! I love how the pin adds dimension and shine, and gives the card a finished look!

Thank you so much for stopping by today! I hope you were inspired!

Momenta Products Used:
PA-2240- Family Forever 12X12 Premium Paper Pad
ST-4838- Family Forever Sticker Kit
ST-4791- Puffy Title Stickers Family Forever Glitter Treatment

Purple Cows Products Used:
Pin it #7000
Punch It- Summer #7203

Tuesday, March 13, 2012

Go ahead- Be Negative!

Sometimes it's hard to stay positive when you are around a lot of negativity.  So, I'm going to share you how to turn a negative into a positive.  Negative SPACE, that is!!

If you like what you see here and would like to try it for yourself, I encourage you to enter it into the challenge on the AWDML Blog!  There are fabulous challenges and a great sketch contest that you have until the end of this month to enter!  Check it out HERE!


For all of these cards, I started with plain white cardstock and cut a heart out of it with my Cricut.  I then removed the cut heart and worked with the paper left behind-- the negative space.  I matted it, and popped it up with some foam tape for dimension.  Here's where it gets fun!  I used 4 different techniques to back the negative space left by cutting the hart.  In the first example, I simply used some brightly colored patterned paper (from Echo Park!). 

In the next example, I used some basic blue cardstock which I ran through an embossing folder.

Next comes some twine!  I simply ran a bunch of ahesive along the card base and worked the twine back and forth until it covered the amount of space that would show through the heart.  I love how it turned out!

And finally, I covered a portion of the card base in liquid adhesive and fit a bunch of red buttons on to the space that will show through the heart.  I love the interest and dimension that this technique creates!

Again, I encourage you to celebrate A Walk Down Memory Lane's 9th Birthday with us and check out the challenges and contest on the AWDML blog!  And, of course, make sure you check out all of the goodies in the STORE while you are there!

Thanks for stopping by today!  I hope you were inspired!

Thursday, March 8, 2012

Laces OUT!

I saw some really fun cards on the Fiskars website a while back and it was a fun idea that I tucked into the back of my head. I knew I could adapt it to make some fabulously simple and cute cards with Scrappin' Sports & More papers!
These cards are perfect for a party invitation, a thank you for the coach, or even something sweet for your football fan ("I get a kick out of you....").

Here's how I made the laces....

First, cut a strip of cardstock about 1 3/8" wide. Then, punch one side with your Notebook Edge punch (mine is from EK Success).

Then, flip the strip of paper around and punch the other side. Try to match the notches up as best as you can.

Then, using a sharp pair of scissors, cut the "nubbies" off.

Do the same on the other side and you have perfect football laces!

Just affix them to the front of your card made with some Scrappin' Sports football papers and you have a super sweet, simple card! Isn't it so cute?!?!
Products Used:
#1330- On the Edge Sports: Soccer
#1373- Title Sports: Football

Thanks so much for stopping by today! I hope you were inspired!

Tuesday, March 6, 2012

Congratulations to.....

Thank you to everyone who stopped by during the A Walk Down Memory Lane blog hop!  Your comments were so sweet and very appreciated!

Congratulations to the winner of the $5 Gift Certificate, Me-Ma-Kim!

Please email me at nwise(at)metrocast(dot)net with your email address so we can get you your Gift Certificate!

Be sure to visit the AWDML Blog for fun challenges and a sketch contest!  The party is still going strong!!

Thursday, March 1, 2012

Happy Birthday to A Walk Down Memory Lane!


Happy 9th Birthday to A Walk Down Memory Lane!! 
We are celebrating today with a blog hop so you can get to know our Design Team!


I am so happy to part of the design team again!!
A little about me: 
My name is Nicole Wise.  I live in Southern Maine with my husband, two kids and two dogs.   They are the main reason I scrap.  I love to scrap the funny moments and how they grow and change, as well as the activities we do as a family and that the kids participate in.  During the day, I am a Middle School Music Teacher.  I am in my 14th year of teaching and, while I am super excited when summer rolls around, I do love teaching!  The kids are really fun and keep me entertained every day. 
I have been scrapping for about five years.  In the past few years, it has truly grown into an obsession that I am thinking about all the time, and I am enjoying my roles on several design teams.  I am always looking for fun ideas to use in my scrapping and I enjoy surfing the internet to find interesting things to use and techniques to try.
Besides scrapping, I enjoy toting my kids to dance class, soccer, baseball and karate, as well as playing outside with them in our fun yard.  So, I have lots of opportunities to take photos of them doing fun things to scrap!

We are sharing our favorite projects that we have made in the last few months at AWDML, so after lots of hemming and hawing, I decided that my favorite is the emergency sewing kit that I made from a Sucrets tin and some fabulous Jillibean Soup papers!

Isn't it so cute?!  It sits proudly in my desk at school for when I lose that inevitable button, or even for when someone needs a safety pin.  It's already come in handy a few times!

I used lots of great products from AWDML to make this:
Jillibean Soup Homemade 6- Bean Soup Stickers
American Crafts Cardstock

I have a great giveaway for someone who leaves a comment my blog. One lucky person will recieve $5 Gift Certificate to A Walk Down Memory Lane!! The deadline to comment and enter your name for the Gift Certificate is March 2nd at 11:59PM EST.  I will post a winner on March 3rd, so be sure to become a follower of my blog so you can  find your way back to see if YOU are the winner!

When you are done checking out all the blogs then head back to AWDML Blog  and check out the new contest that is going on. One lucky winner will recieve $25 GC to the AWDML store!!  We have some exciting new changes and alot of fun coming soon!

The next stop on today's hop is Suzanne Spokus' blog!

Thank you so much for stopping by today!  I hope you were inspired!

Sunday, February 26, 2012

Wild About Tigger!

I am having so much fun playing with the new paper lines from Scrappin' Sports & More! I think it's really fun to come up with ideas to use the papers other than the way they were intended. And, today's project is no exception!

First, I used the zebra print on the Cheer paper from the Girls Rule Collection. Then, I got comfy with American Idol and a marker and went to town. (Yep! I'm a lefty...)

Before I knew it, I no longer had zebra paper-- I had TIGER paper.... make that TIGGER paper!


Seriously! Is that fun, or what?!!? Here's a close up of the paper. I cut the word "WILD" out of the paper with my cricut to make my title.


I have so many fun ideas swirling around in my head of what to do with all of this fun paper! I can't wait to show you more!

Thanks for stopping by today! I hope you were inspired!

Scrappin' Sports Products Used:
#1387: Girls Rule- Cheer

Saturday, February 25, 2012

Momenta Flower Card

Hi, Everyone! I have  a SUPER easy card with you that's featured on the Momenta blog today!   It’s easy to make and easy to put together several at a time in an assembly-line-style if you need to make a LOT of cards in a jiffy—invitations, thank you cards, birthday cards, etc. I saw a similar card online and set about figuring out how to make one of my own. I love that it looks so much like the Momenta logo- that's why I decided to call it a "Momenta Flower!"

To make ONE card, you will need:
1 Card Base cut at 4 ¼ inches by 5 ½ inches
Cardstock cut at 4 ¼ inches square (mine is black)
4 Squares cut at 1 ½ inches (I used for different patterned papers from the Kaliedoscope collection)
4 squares cut at 1 inch
Decorative strip of paper cut at 4 1/1 inches (I used my scalloped edge punch)
Tape Runner/Adhesive
Foam Tape
Corner Punch
Sentiment stamp/Ink
Button
Strong Double-Sided adhesive or wet glue

First, add adhesive to the decorative strip of paper and attach it to the back of your cardstock (black) square. Leave just enough hanging out so that you can see the pattern (about ¼ inch).


After attaching your cardstock square to the front of your card base (sorry- forgot to take a photo of this step), stamp your sentiment.


Now, using a corner punch, punch two opposite corners of your 1 ½ inch squares.


Attach the 1 ½ inch squares to the front of your card with the sharp corners pointing toward the corners of your square piece of cardstock.


Now, punch opposite corners of your 1 inch squares and add a bit of foam tape to the back. Adhere them on top of the 1 ½ inch squares. This creates a great bit of dimension!


And, for the final touch, using a strong double sided adhesive (or a wet glue), attach a button to the center of your flower!


Wasn’t that easy? Once everything was cut, I assembled these six cards in a matter of 10 minutes!


Thanks so much for stopping by today! I hope you were inspired!
Momenta Products Used:
PK-2383: Kaleidoscope Pyramid Pad

Thursday, February 23, 2012

A little of this and a little of that....

Hi there, everyone!  I'm so happy to share that I am once again designing for Wholly Scrap in North Hampton, NH!  It's such a fun little scrappy store, I just wish they were closer (although my husband is proably glad they aren't!)  One of the things that's fun (and also challenging) about designing for Wholly Scrap is that they give me a bunch of different things to design with-- things I may not have chosen for myself.  My head spun with this month's goodies, but I am really happy with the layouts that I made!

First up, some Karen Foster!  This is actually "baby boy" paper.  Sadly, I lost my entire hard drive when my son was about a year old and lost every single photo of my kids that had been taken up to that point.  So, I don't have many baby picutres available to me for scrapping.  But, what I did have was photos of our trip to the Camden Children's Garden in Camden, NJ!  The kids favorite part was the Dinosaur Garden!


Up next is some paper from Cosmo Cricket!  I LOVED this line when it came out and was happy to be able to use it.  I also used some inpsiration from a PageMaps sketch!


Robin's Nest is a manufacturer best known for their fun little "Dew Drops" that come in a zillion colors.  Many people don't realize that they make papers, too!  This one was gorgeous with a fabulous texture and lots of great glitter accents.  It was so pretty that I didn't want to do a lot to it.


And, finally a page with Momenta Paper!  I was given the "Bicycle" paper to design with.  I am often intimidated by papers that are made to look like a scene.  But the key is to not be afraid to cut the paper up and use the parts that work best for you.  So, I cut the bottom portion off and added it to a piece of blue cardstock to create a great blue sky background.  Then, I added a nice, bright sun and some clouds.  Then I just needed a few photos, a title and some journaling!


One of my favorite parts of this layout (besides my son's handsome face) is the ribbon!  I cut it into a fringe so that it would curve with the line of the paper and give the illusion of grass!  Isn't it cute?!

Thanks so much for stopping by today!  I hope you were inspired!

Tuesday, February 21, 2012

Time for Peace!

When my daughter turned 8, we re-decorated her room for her birthday. She picked out the paint, the bedding, everything-- and she did a GREAT job! We are still picking away at little decor items to make the room "perfect" and today, we added the latest item.... A CLOCK! I purchased a clock kit at a craft store last summer and was waiting for just the right scrappy stuff to come along to make it. If you wait... it will come! This time it came in the form of Momenta's Free to Be Me collection! My daugther is obsessed with anything that has a peace sign on it, so this collection is perfect for her!

Believe it or not, this clock came together in just about 45 minutes! First, I painted the edges of the wooden circle with black paint, to give it a finished look. While that dried, I colored the clock hands with a black sharpie. They were gold, but I thought black would look better. Then, I traced and cut the circle of paper from the Premium Paper Pad. Then, using Mod-Podge I put the circle onto the wooden circle and then put another layer of Mod-Podge on the top. I did a pretty thin layer, so it dried pretty quick. Then, I added the stickers, the black dot around the edge and put the clock hands in. Finally I just put a batter in the back, a nail in the wall and there you have it-- a cute clock and a happy little girl!
Here it is from a different angle. The puffy stickers give it some fun dimension (and sparkle!) and there's still plenty of room for the clock hands to move around.
I used to shy away from making altered projects, but when I find one that has a great use (and makes my daughter so happy) I can't help but go for it!
 
Thanks so much for stopping by today! I hope you were inspired!
 
~Nicole
 
Momenta Products Used:
PA-2263: Free to be Me Premium Paper Pad
ST-3190: BW Med Dot Puffy Alpha
ST-4740: Free to Be Me Puffy Icon

Sunday, February 19, 2012

Duffy the Defuzzinator!

Our sweet Goldendoodle LOVES to completely destroy tennis balls.  First, he attacks the sqeaker and then off comes the fuzz.  Since we aren't really tennis players in our family, scrapping Duffy's escapades seemed like a great use of Scrappin' Sports & More's new tennis paper!  I just added some Momenta stickers (the cool black ones) and POOF... a layout about Duffy the Defuzzinator!


Thanks for stopping by!  Come on back for a fun Momenta project soon!