Saturday, December 28, 2013

Merry Christmas Morning

Hey, there everyone!  Here's a quick article I shared in this week's AWDML newsletter.  If you'd like to be getting these newsletters full of inspiration and prodcuts, just click HERE!

 A really popular technique to use when you would like a page to come together quickly is "blocking." Blocking is when you use blocks of color or patterned paper to balance your design. When creating a scrapbook page, the photo(s) would be included as one (or several) of the blocks. There are many, many examples of this technique available for inspiration. 

For my layout, I used a very simple, but very obvious blocking design.

 
The red block of paper is the same size as my photo in order to create balance. The journal cards are smaller than the other blocks but balance eachother in the design.
 

I used quite a few of the stickers from the collection, along with some foam tape to create dimension on the page. On this photo, you can also see the beautiful script for the title cut from Memory Box dies.

Here, you can see the "Nice List" featuring everyone in our family (including the dog) using some of the alpha stickers included with the collection.


And, finally the journaling block with the tree. I added the "merry memories" stickers for balance and dimension.
 
I definitely suggest trying out some blocking when you would like to create a fun, simple and quick page!
Products Used:
Patterned Papers and Stickers: Simple Stories December Documented
Stickers: Thickers
Adhesives: Sco th Quick Dry Glue and Best Creations Foam Tape

Thanks for stopping by today!  I hope you enjoyed my layout and that you might consider trying this technique out!  Have a great day!!

Wednesday, December 18, 2013

We Wish you a Merry Kissmass....

Hey, everyone!  Thanks for stopping by today!  Here's a fun post I shared last week on the AWDML Blog as part of their 12 Days of Christmas event.

Happy Scrappy Wednesday, everyone and welcome to day 11 of our 12 Days of Christmas event! I have a fun and simple project to share today that would make a great gift for teachers, classmates, office friends, postal carriers, bus drivers and anyone else that you like to give a little "something" to every Christmas.

Start by printing the sentiment on your printer. You can use any word processing program and it should end up being about 2" by 3". The sentiment I used was "We wish you a Merry Kissmas and a Chappy New Year."

Now, cut a piece of patterned paper to 3 1/2" by 4 1/2". Using a craft knife, cut two 1 1/2" slits that are 1 1/4" from the top and bottom edge and about 1/4" from the left edge. See below. The RED represents the cuts.


 Once your slits are cut, simply slip your tube of chapstick in and adhere your sentiment.


You can leave it simple as you see above, or you can dress it up a bit more like this....


I hope you enjoyed today's project that you're inspired to make a few gifts!

All of the products for this project are available at A Walk Down Memory Lane!

Thanks so much for stopping by today!

Wednesday, December 11, 2013

Christmas Tree Ornament

Hey, everyone!  Just sharing my project from last week on the AWDML blog!  Enjoy!

Happy Scrappy Wednesday! Today I want to share a fun and super easy Christmas ornament that you can make for your own tree, or as a gift for someone else. These would also be great to add to a package or gift bag!
First, cut a strip of patterned paper 12″ by 3 1/2″. Since we’re making a Christmas tree, I would suggest using green. Now, measure and mark along the bottom of the strip every 2 1/2″. Along the top, measure 1 1/4″ then move your ruler over to that mark and mark every 2 1/2″ from there. Once you’ve gone all the way across, connect the marks to look like this:


Here’s a closeup of what the measurements should look like:

 
Now, cut carefully along the lines to make eight triangles. Place a triangle on your scoreboard and score at 1 1/4″. It should end up going right down the middle. Repeat for each triangle.

Now, fold each triangle in half with the side you want showing on the inside of the fold. Then, ad adhesive to one side of the back of the triangle and adhere it to another triangle matching the edges as much as possible.
 
Continue adding triangles until you’ve used them all (or until you are happy with the result- I would recommend at least six). Then, add a ribbon, as shown.
 
Now, adhere the two final sides together to close up the “tree”. The ribbon shold be coming out the top like this:

 
Now, you can add some additional decorations such as pearls or gemstones, or just leave it simple.
 
(You'll have to excuse the photo... we didn't have our Christmas tree up yet, so I used one of the houseplants instead!  LOL!)

Thanks so much for stopping by the blog today! I hope you enjoyed the project and that you’re inspired to try on of your own!  All of the materials for this project are available at A Walk Down Memory Lane!

Come back again next week for another fun Christmas project!

Wednesday, December 4, 2013

Just Because...

Hey there, everyone!  Here's a layout I shared on the AWDML Blog last week!

Happy Scrappy Wednesday, everyone!!
I decided that I wanted to use some papers from my stash today-- something that I've had for a while. So, while looking through, I came across the Just Because collection from Little Yellow Bicycle. I LOVED this line when it first came out and I {might} have hoarded it because I didn't want to cut it. I know....I know....
So, today I'm using it and I'm super happy with the layout that I made. I used the title of the collection as inspiration for my title.


And, here's a close-up of the title where I colored the DIY Thickers with a Copic Marker to match the layout perfectly!


I hope you enjoyed my layout today and that you're inspired to run to your scrappy stash to create something beautiful... just because!

Thank you for stopping by!

Wednesday, November 27, 2013

SNOW CUTE Snowman Card

Here's a card that I shared on the AWDML blog last week!

Happy Scrappy Wednesday, everyone!!
Lately, I've been sharing a snowman theme with you and today I've got another SNOW CUTE Snowman Card to share with you!
I started with a blue background which I inked with Antique Linen Distress ink. Then, I cut the layers of snow and inked them, as well. I like how the Antique Linen ink adds some shading and dimension without adding too much color.
Then I created my little snowman. I cut the circles using my Nestibilities Circle dies and free hand cut the hat, scarf, carrot nose and arms with a sharp pair of scissors. I love the whimsy that is created by putting the larger "snowball" as the top of my snowman! Isn't he SNOW CUTE?!


The eyes and smile were created with my Copic Multiliner pens and the snowflakes were made with the Atyou Spica pens (also from Copic). I just LOVE these pens for adding detail and journaling to projects!
I hope you enjoyed my card today and that you're inspired to make of of our own!

All materials for this card are available at A Walk Down Memory Lane!

Wednesday, November 20, 2013

It's Turkey Time!

Hey, everyone!!  Here's a post I shared on the AWDML Blog last week!  Enjoy!

Happy Scrappy Wednesday, everyone!! It's Turkey Time and we're getting ready for Thanksgiving. While we are sorting out who is bringing the cranberry sauce and chocolate pie, we're also thinking of decorating and of those family members who may not be able to join us for dinner. So, today I want to share a sweet little paper crafted Turkey that could be used on a card front, napkin ring, place card or any other way you could think of! You can make him in lots of different sizes, depending on the size of the punches or dies that you use!

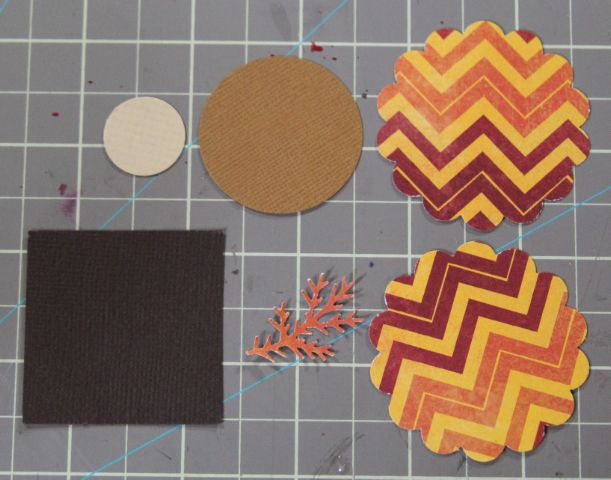
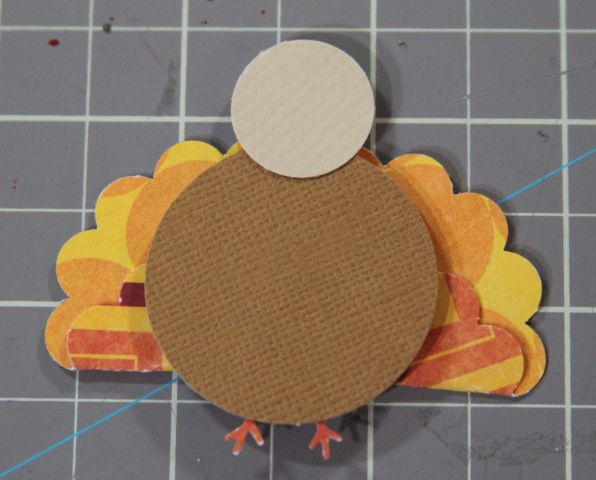
First, gather up the pieces you need to create you turkey: One small circle for the head, one medium circle for the body, two larger circles (scalloped if you have them) for the feathers, a square/scrap for the hat and a punched branch for the feet.

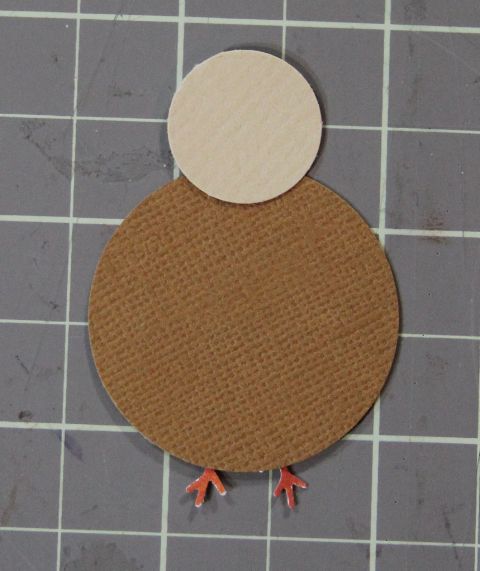
Now, adhere the small circle to the medium circle and snip off two pieces of the branch and adhere them to be back of the body as shown:

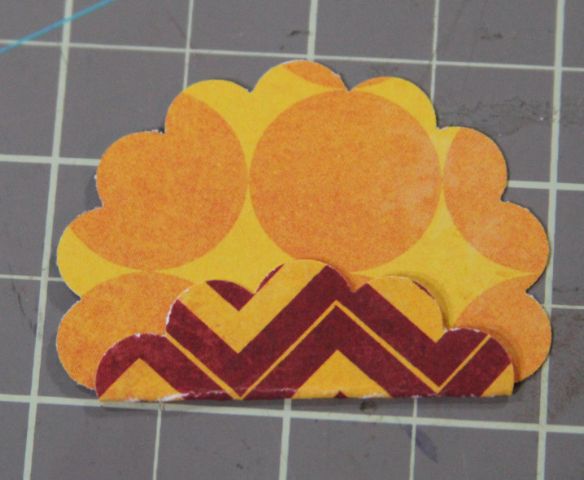
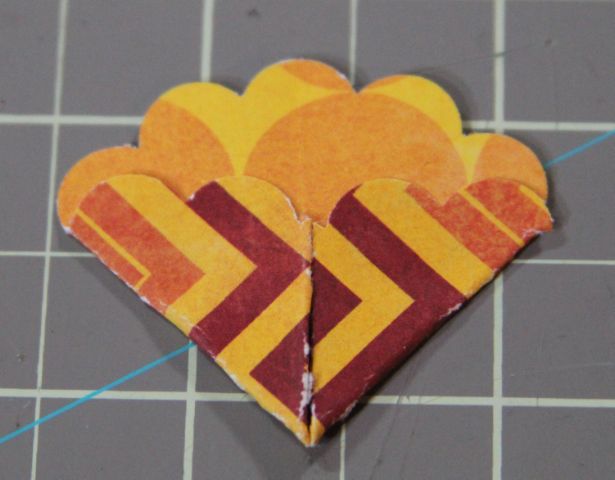
To make the feathers, find 5 scallops and fold them upward as shown:
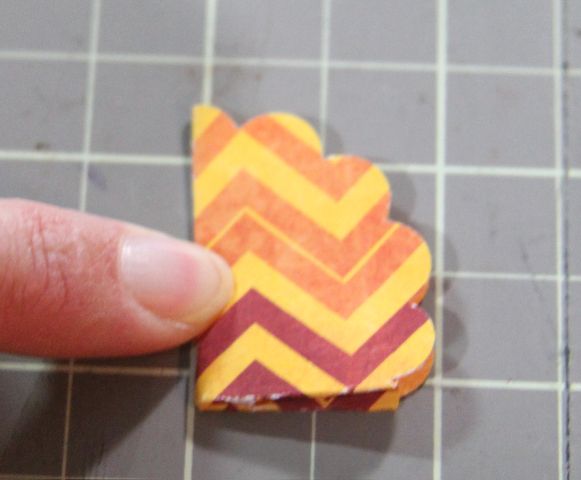
Fold in half:
 
Unfold and find the crease that you just created. Now fold each corner up to meet that middle crease and glue in place


Now, repeat the same process with the 2nd scalloped circle. Using foam tape, stick the two "feather" sections to the back of the body.
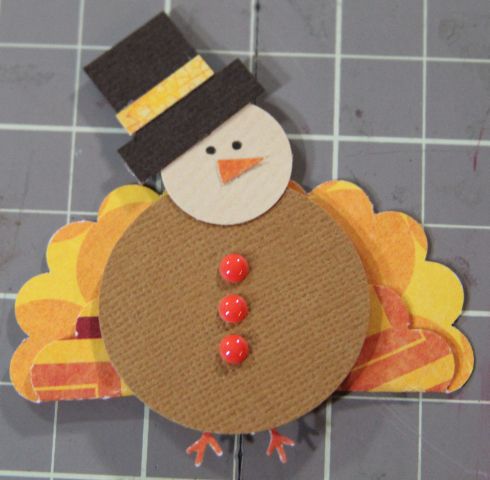
Now, cut his hat and decorate him how ever you'd like! Isn't he cute?
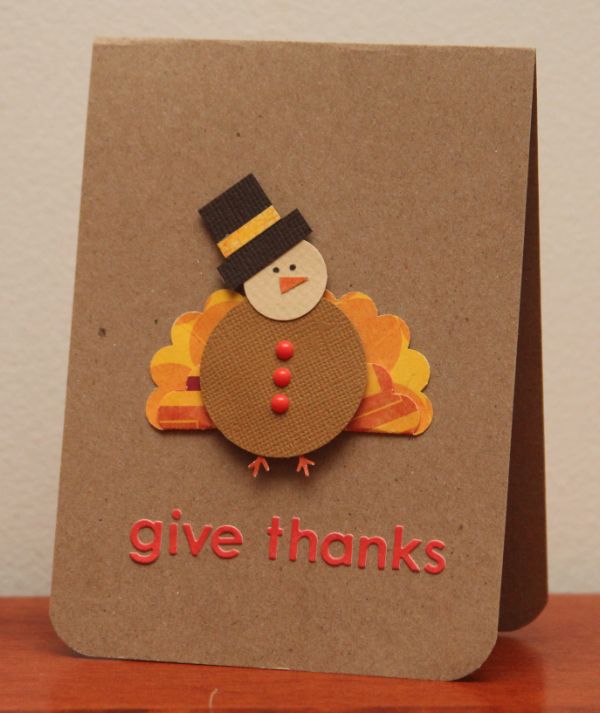
Now you can add him to a card or something fun and decorative on your Thanksgiving table! Here, I added him to a super simple card!

Thanks so much for stopping by today! I hope you were inspired to create a little turkey for yourself!

All materials for this project are available at A Walk Down Memory Lane.

Enjoy!

Wednesday, November 13, 2013

Snowman Popcorn Gift

Hey, Everyone!  Here's my post from last week on the AWDML Blog!

Happy Scrappy Wednesday, everyone! Just popping in (hahaha!) to share a fun (and easy!) gift that would be great for teachers, office staff, neighbors or even party favors at your holiday shin-dig! A Snowman Popcorn Wrap! That's right-- I simply created a snowman that wraps around a bag of microwave popcorn!

I started with some white cardstock that was approximately 6" X 12". Depending on the brand and size of popcorn you use, yours may need to be taller or shorter. Then, I simply put the package of popcorn in the middle and folded my paper around it and ahdered it in the back to create a sleeve. Then, I slid the popcorn out while I made his face.

The scarf is simply paper with a fringe cut from scissors with some added twine and a heart. The face is made from a carrot cut from a scrap of orange cardstock, some red ink sponged on and a black pen. I stamped a simple, general sentiment on there, as well. You could add buttons instead of a sentiment, if you wanted!

Here's my little guy:

Isn't he SO cute?!?! There's lots of fun ways you could change this up and maybe even use it for something besides popcorn. I think this would make a great card front!

I hope you enjoyed my project today and that you are inspired to make one of your own! Thanks for stopping by today!

Be sure to check out A Walk Down Memory Lane for all of the products used to make this project!

Tuesday, November 12, 2013

Accoridon Star Tutorial

Hey, there everyone! Here's my post that just went up on the BOAF Blog today! Thanks for visiting!

Today I want to share a fun accordion star that would be great for the front of a card (Christmas, birthday... you name it!) or to add dimension to a layout or other project!  This is a Pinterest Inspired project from this blog.
First, make a template using a piece of thick cardstock or thin cardboard. Cut a strip 1 3/4" by 6". Then, draw a horizontal line 1" from the top of the strip. Then, mark at 1 3/16", 2 3/8", 3 9/16" and 4 3/4" as shown below.

Now, connect the marks as shown:

And, cut along the lines so that it looks like this:

Now, to make the star, start with a piece of patterned paper cut 1 3/4" by 12". Fold the strip in half (so that it's now 6" long. Place the template on the strip and trace. be sure that the fold of the paper is to the RIGHT side of the template. It should look like this.

Now, cut along the line and unfold your strip.

Then, using a score board and scoring tool, score at every 1/4" the entire length of the strip and accoridon fold it.

Now, adhere the ends of the strip together and punch a circle from scrap paper to use for gluing the star down.

And, now for the big moment.... gather the straight edge of the strip together and push down toward the center. Glue it down with a strong ahesive (I reccommend hot glue). Adjust quickly so that the small circle in the center of your star is even and that the points are as even as possible.

Now, simply add the star to your project!

I bet you hadn't thought of the November kit working great for Christmas cards, did you?! I love how the gold and blue of the kit extras work so beautifully together for this card! There's still a few kits and plenty of extras left! Be sure to check out the BOAF Botique to get yours today!

I hope you liked the tutorial today! I can't wait to see what you do with it! Thanks so much for stopping by today!

Wednesday, November 6, 2013

Halloween Treat Boxes

Hey, everyone!!
Here's a post I shared last week on the AWDML Blog (before Halloween!).  Thanks for checking it out!

Happy Scrappy Wednesday, Everyone!

Today I have some fun (and easy!) Halloween Treat Boxes to share with you! These would be perfect for whipping up a large batch for your kidI did three different designs, but they all started the same:
First, cut a 3" by 8 1/2" strip of cardstock. I used black. Then, score it at 3", 4" and 7". Fold on all of the score lines and then you'll have this:


And the front....

 
Now, the fun part-- to decorate the front! For this one, I used my oval dies to create a little pumpkin, I hand cut the stem and the "curly Q" is just a thin strip of cardstock that's been wrapped around a pencil. Cute, eh?


Here's little Frankie! I simply hand cut the "fringe" for his hair, used a small circle punch for his eyes, and drew the rest with a black marker!


I also created a ghost at the last second, but forgot to snap a photo just of him. I started with a 3" by 3" square of white and hand cut the shape of the ghost. Then circle punched the eyes and mouth using two different sized circle punches.

Here are all of the treat boxes together. When I attached the "characters" to the fronts of the boxes, I only put adhesive on the top 1/3 so that they would stick only on the top flap of the box. So, if you lift up on the character, the box will open to reveal the Halloween treat inside!

I'm already cooking up a Christmas version of this project! Stay tuned for that! Thanks so much for stopping by today! I hope you enjoyed the project!

Saturday, November 2, 2013

November Kit from Birds of a Feather!

Here's my reveal that was just shared on the BOAF Blog!

I know, I know... I say it with every kit, but really-- it's TRUE!! The colors, textures and patterns are just gorgeous! Amy has such a fantastic sense of how to put together the papers and embellishments!

When I first looked at the kit, I thought it was pretty feminine and started thinking of photos of my daughter that I could use. But, then I decided to challenge myself to make a masculine layout. I took a cute photo of my son in the leaves just yesterday. Since he was wearing a bright green shirt, I flipped it to black and white so that it would work with the colors.


The background paper, the banner pieces, the date stamp, the glittery stickers and the word "ten" (cut from a 12X12 sheet) are all from the November Extras. Amy has fantastic kits but incredible add-ons as well. I can never resist getting all of them!

I knew that I wanted to add a pop of color in there and by layering two banner pieces together, I was able to get the pop of color I wanted as well as some fun dimension. You can also see the fun date stamp here!


I had fun creating the title, but I also used the journaling spots from the kit to make a scalloped border along the top of the page for some added interest. Each journal spot is actually a small stack of papers that you peel off one at a time! So, I just cut a few in half and slid them under the paper. I also cut the star out of one of the patterned papers and adhered it with foam tape.


I also made a simple card to share with you today! The "HELLO" was cut from one of the patterned papers with the kit. I added some fun black bling from my stash to make it a little more flashy. I love the way the black and pink really pop!


I hope you enjoyed my reveal today and that you'll be sure to check out the November 2013 BOAF Kit AND all of the Extras! You will not regret it... ever! Thanks so much for stopping by today!